Mandelbrot Set Visualization

mandelbrot-set

Drawing Fractals: Mandelbrot Set Visualization

Using HTML canvas to visualize Mandelbrot set. Rendering large sets of points efficiently.

Mandelbrot Set

Mandelbrot set is defined as a set of numbers z on the complex plane for which the sequence of numbers computed using the following expression

mandelbrot_sequence

is such that their norm does not grow to the infinity as the index n increases indefinitely.

If at this point the notions of complex number, operations with complex numbers and computing the norm are not clear, please, refer for more details to the following Wikipedia article https://en.wikipedia.org/wiki/Complex_number for details.

Essentially a complex number can be considered to be a point on a two dimensional coordinate plane with operations +, , /, * defined for pairs of such points in a certain way.

An interesting thing about the Mandelbrot set is that despite the relative simplicity and mathematical formality of the definition, the set itself turns out to be quite curiously looking, as if it were some real thing occurring in nature and in addition to that it also has a property of repeating the same pattern infinitely at every scale. The structures with the property of repeating itself at every scale are called fractals https://en.wikipedia.org/wiki/Fractal.

On the other hand looking at the Mandelbrot set from a philosophical perspective we can expect that naturally occurring self repeating structures can probably be described by similar relatively simple mathematical laws, that is, sometimes what seems as utterly irregular at the first sight can in fact be described and studied formally.

But rather than go into the details about fractals and their importance, in this article we will focus on a task of computing and rendering the Mandelbrot set in a browser.

The rendition of the set itself we will obtain by the end of the article is shown in the beginning.

Escape Algorithm

One algorithm that can allow us to determine whether a point belongs to the Mandelbrot set or not is the so called Escape algorithm.

The idea behind the algorithm is to compute the sequence of numbers from the definition of Mandelbrot set iteratively until a certain predefined maximum norm is reached or we have reached some predefined maximum number of iterations.

Then for every point on the complex plane we can find the number of iterations it takes for the numbers from the sequence to acquire a sufficiently large norm. If on the other hand the norm always stays too small, which is the case for points belonging to the Mandelbrot set, then we just observe that the maximum number of iterations has been reached and stop the iteration process for such a point.

Then we can color the points on the plane depending on the number of iterations corresponding to each point. The larger the number of iterations – the brighter the color, for example.

Now let’s put this informally discussed algorithm into code

  var MAX_VALUE = 4.0;
  var MAX_ITERATIONS = 30;

  function getEscapeIterationsNumber(pointX, pointY) {
    var currentIteration = 0;
    var x = 0;
    var y = 0;
    while ((currentIteration < MAX_ITERATIONS) 
      && (x * x + y * y < MAX_VALUE)) {
      const xOfSquare = x * x - y * y;
      const yOfSquare = 2 * x * y;
      x = xOfSquare + pointX;
      y = yOfSquare + pointY;
      currentIteration++;
    }
    return currentIteration;
  }

Here we compute the number of escape iterations for a complex number pointX + i pointY which is, like we noted before, can be represented by two coordinates on the complex plane. We use the rule for computing the next sequence number from the definition of the Mandelbrot set in the body of the while loop and increase the iteration number.

If there are any doubts it is possible to refer to the same Wikipedia article about complex numbers to verify that indeed this is how complex numbers are multiplied and added. We will however leave the detailed explanation out of the scope of the present article.

We continue to iterate until the norm has become sufficiently large or the maximum number of iterations has been reached, and after that point we return the total number of performed iterations.

Next we still need to compute the color of the point based on the computed number of iterations. This turns out to be quite easy to do, as we just assign the white color to the maximum number of iterations, black to 0 iterations and divide the color spectrum between black and white into MAX_ITERATIONS values.

  var MAX_COLOR = 255;
  var COLOR_SCALE =
    Math.floor(MAX_COLOR / MAX_ITERATIONS);

  function getColorForIteration(iterationNumber) {
    return Math.min(
      iterationNumber * COLOR_SCALE,
      MAX_COLOR
    );
  }

The algorithm itself combines the two methods above

  host.EscapeAlgorithm = {
    getColor: function(x, y) {
      return getColorForIteration(
        getEscapeIterationsNumber(x, y)
      );
    }
  };

So far everything seems quite simple, but how about rendering the set on a screen? For once we will have to scale the points so that the screen represents the interval [-2, 2] on both axis of the plane using a sufficiently large scale so that the Mandelbrot set is visible.

We would also like to show the progress of the computation and update the visualization dynamically as more points have been handled and we know whether they belong to the Mandelbrot set or not.

Rendering on Canvas

Let’s now start defining a few simple rendering primitives that will help us display the set.

We will first create a Display object that will provide convenient methods for interacting with the HTML canvas which we will ultimately use for drawing.

  function Display(canvas, width, height) {
    this.canvas = canvas;
    this.width = width;
    this.height = height;
    this.context = null;
    this.imageData = null;
  }

We pass to the constructor a canvas DOM element, and the desired width and height of the canvas.

  Display.prototype.initialize = function() {
    this.canvas.setAttribute('width', window.innerWidth);
    this.canvas.setAttribute('height', window.innerHeight);
    this.context = this.canvas.getContext('2d');
    this.context.font = FONT_SIZE_PX + 'px Arial';
    this.imageData = this.context.getImageData(0, 0,
      this.width, this.height);
  };

Next we resize the canvas to the desired width and height, get a 2D drawing context, set its font and initialize the image data.

We will use image data to draw points on a canvas in a batch fashion as there may be quite of them to draw. Using imageData here is an optimization opportunity provided by the canvas itself: rather than calling some drawing primitive of the canvas for every single pixel multiple times we will instead first set pixel data in imageData and only after that we will repaint the whole canvas once.

  Display.prototype.drawPixel = function(x, y, color) {
    var index = (x + y * this.width) * 4;
    this.imageData.data[index + 0] = color;
    this.imageData.data[index + 1] = color;
    this.imageData.data[index + 2] = color;
    this.imageData.data[index + 3] = FULLY_OPAQUE_ALHPA;
  }

drawPixel computes the index inside the imageData array given the coordinates on the canvas x and y and sets the color data of the pixel assuming that we will draw the image in black and white.

  Display.prototype.repaint = function() {
    this.context.putImageData(this.imageData, 0, 0);
  }

The actual drawing happens inside the repaint method where all the pixels corresponding to the whole imageData array get repainted.

Here is one of the takeaways from this article: it is much faster to use canvas’s image data to draw large sets of points rather than to try to dry them individually.

We would also like to show ‘the computation border’: horizontal green line moving from top to bottom of the screen such that all the pixels above it the set have been already computed and drawn.

  Display.prototype.showComputationBorder = function(y) {
    this.context.fillRect(0, y, this.width, 1);
  }

Likewise we can show the current progress at the top left corner of the canvas: percentage of the total pixels computed and the average speed of computation in thousands of pixels.

  Display.prototype.showProgress = function(progress, speed) {
    this.context.fillStyle = 'green';
    var progressInfo = progress.toFixed(2) + '%';
    var speedInfo = 'Speed ' + speed + 'K pixels/second';
    this.context.fillText('Drawing Mandelbrot set... '
      + progressInfo + ' ' + speedInfo, 20, 20);
  }

Drawing Mandelbrot Set

Now that we have the implementation of the Escape algorithm and can draw pixels and overall progress on the canvas, we need to still put all this together.

  MandelbrotSetVisualization.prototype.computeAndDraw = function() {
    var self = this;
    this.startTime = new Date().getTime();
    var width = this.width;
    var height = this.height;
    this.totalProgress = 0;
    var promises = [];
    for (var y = 0; y < height; y++) {
      promises.push(new Promise(function(resolve, reject) {
        setTimeout(function(y) {
          for (var x = 0; x < width; x++) {
            const color = EscapeAlgorithm.getColor(
              self.scaleX(x), self.scaleY(y)
            );
            self.display.drawPixel(x, y, color);
          }
          self.totalProgressPercent += self.progressPerLinePercent;
          self.drawCurrentState(y);
          resolve();
        }, 0, y);
      }));
    }
    Promise.all(promises).then(function() {
      self.display.repaint();
    });
  }

In the lines 8-22 we iterate through all the rows of the canvas and handle every row asynchronously by wrapping the computation into a promise at the line 9 and using setTimeout at the line 10.

The actual computation for every row happens in the lines 11-18. 11-16 we go through all the columns in the current row of the canvas, compute the color for the current pixel of the canvas with getColor and add it to the canvas data with drawPixel. Note that we also scale the pixel coordinates using the functions scaleX and scaleY so that the canvas contains the interval [-2, 2] at an appropriate level of detail.

  MandelbrotSetVisualization.prototype.scaleX = function(x) {
    return (SCALED_SIZE * x / this.size)
      - (SCALED_SIZE * this.width) / (2 * this.size);
  }
  MandelbrotSetVisualization.prototype.scaleY = function(y) {
    return (SCALED_SIZE * y / this.size)
     - (SCALED_SIZE * this.height) / (2 * this.size);
  }

Finally at the line 17 we update the total progress value and at the line 18 draw the current state of the canvas.

It also turns out to be convenient not to redraw the whole current state of the canvas for every row, but only for every 50 rows or so (value defined by the variable UPDATE_CANVAS_STEP). Repainting the whole canvas is quite an expensive operation and skipping repainting for some of the rows significantly boosts the performance.

  MandelbrotSetVisualization.prototype.drawCurrentState = function(y) {
    if (y % UPDATE_CANVAS_STEP === 0) {
      this.display.repaint();
      const elapsedTime = new Date().getTime() - this.startTime;
      const thousandPixelsPerSecond =
        Math.floor((((y + 1) * this.width) / elapsedTime));
      this.display.showComputationBorder(y);
      this.display.showProgress(
        this.totalProgressPercent, thousandPixelsPerSecond
      );
    }
  };

Otherwise we just repaint the canvas, get the elapsed time in milliseconds since the start of the visualization, compute the speed, show the computation border and the overall progress.

In the method computeAndDraw we finally wait for all the promises to resolve at the line 23 and do a final repaint of the whole computed Mandelbrot set at the line 24. This time we just display the whole set without the computation border or progress information.

Let’s note that it is important to wait until all of the asynchronous tasks of computing each row of the Mandelbrot set fully complete before doing the final repaint of the canvas. Otherwise we may end up with a race condition and one of the asynchronous tasks being randomly chosen to be repainted last which will result in an incomplete set being shown. Hence the need to deal with promises and await the completion of asynchronous tasks.

Likewise it is important for parts of the computation to be asynchronous as otherwise the canvas will not be repainted by the browser with intermediate results as there will be no execution time to be allocated for that.

When we finally run the simulation in the main method the Mandelbrot set is gradually painted on the screen as the computation progresses.

function main() {
  var width = window.innerWidth;
  var height = window.innerHeight;
  var canvas = document.querySelector('canvas');
  var display = new Display(canvas, width, height);
  var setOfMandelbrot = new MandelbrotSetVisualization(display, width, height);
  display.initialize();
  setOfMandelbrot.computeAndDraw();
}

window.addEventListener('load', main);

The full source code of the visualization is available as a gist https://gist.github.com/antivanov/59290f4048b03c7d01b88526fecf8afb and is hosted here https://output.jsbin.com/gowiruwiku/2

Conclusion

  • It is quite convenient to use HTML Canvas for visualizing data
  • Canvas API provides optimization opportunities for drawing multiple pixels in batches
  • Repainting the whole canvas is quite an expensive operation and some repaints can be skipped to increase the perceivable speed
  • Large computation tasks are better split in smaller asynchronous parts so that the browser gets the chance to repaint the updated canvas

Web Components and Friends: React.js, Angular.js, Polymer

Web App Development Challenges
Frameworks, Libraries, Standards
Need of Componentization
Web Components
Polymer
React.js
Angular.js
Why not jQuery?
Other Options
Different Mental Model
Putting It All Together
Summary
Links

Web App Development Challenges

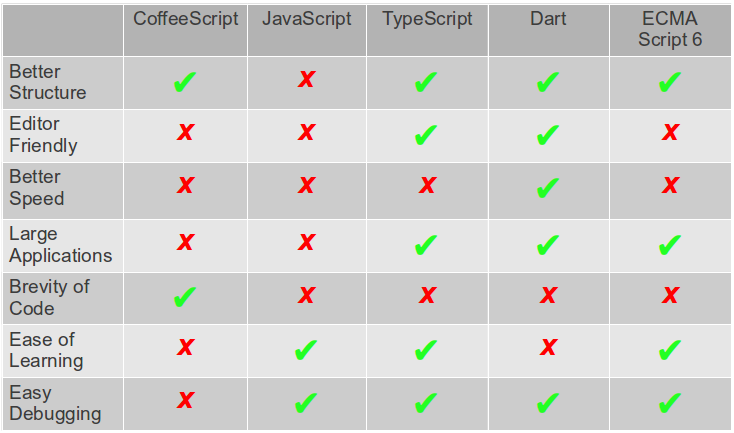
Web applications become larger, more sophisticated and virtually indistinguishable from desktop apps. This leads to more JavaScript, markup and styles being used. In “JavaScript and Friends: CoffeeScript, Dart and TypeScript” we discussed how JavaScript is adapting to this trend and what alternative languages started to appear that try to address some of the major pain points.

There are multiple challenges in developing large modern Web apps, some of them are listed below.

  • Maintainability

    It should be relatively easy to find a piece of code responsible for a certain part of the app. Ideally, this piece of code should encapsulate some of the implementation details of that part and be simple enough to understand and modify it without introducing any bugs.

  • Testability

    It should be easy to instantiate pieces of code comprising the app and verify their behavior in a test environment. We would also like to test how those pieces interact with each other and not just that every one of them works properly on its own.

  • Code reuse

    If in different places of the application there are similar UI elements or functionality (such as, for example, dialogs) it should be possible to reuse the same code, including markup and styles, across the app in all such places.

  • View updates

    When the data being presented on the UI as part of some view is modified, the corresponding view needs to be re-rendered. We should be smart and re-render only those parts of the app that really need it in order to avoid loosing the visual context after a potentially quite costly complete re-render.

These and other challenges are more or less successfully resolved by various libraries and frameworks or combinations of them. One notable example many are familiar with is Angular, which to certain extent addresses them all.

However, in this post we are not going to discuss all the intricate details of frameworks like Angular, partly because they offer much more than just componentization and code reuse, and partly in order to stay a bit more focused. Neither are we really going to particularly discuss other challenges besides componentization as every one of them would probably merit a separate blog post. For example, it is more or less established that some form of MVC (MVV, MVP, etc.) can help with maintainability and view updates, but we will discuss it here only partially. Fully covering the outlined challenges and different approaches to address them will probably lead to a medium-sized book on developing Web applications and this is definitely not what we are after in this article.

So we will try to stay focused on one particular topic: componentization and discuss some of the philosophy and ideas that various frameworks and libraries exhibit in this particular area, but which are unfortunately still quite often lost behind the intricate technical details of the APIs they expose or are not emphasized enough and underutilized by developers. For example, I saw at least a few Angular projects that did not reuse as much code as they could have just because for some reason they avoided using custom directives (a bit later we will discuss how those relate to Web Components). After reading this article hopefully you will have a better grasp of the subject and also understand that despite superficial differences between APIs some common principles behind are still quite similar.

Frameworks, Libraries, Standards

In this post we will be talking about, looking into the technical details and comparing Web Components, Polymer, React.js and Angular.js in order to see how they relate to each other in regards to componentization, and what similarities and differences there are. But before we can do that, let’s first establish some initial relationship between these technologies and briefly explain what every one of them is and is not. This will a bit simplify further reading.

  • Web Components http://webcomponents.org/

    Is just a set of standards that facilitate development of reusable components and should be natively supported by browsers. The level of support is different depending on the browser. This is not a library or framework.

  • React https://facebook.github.io/react/

    Is a functional-style “view” library for feeding data into a tree of React components and rendering this tree into HTML. This is not a framework as React does not suggest a predefined way of creating a web app and just deals with the view part. In fact, you can use React with other frameworks, but the most canonical way suggested by Facebook would be to use it in a Flux architecture.

  • Polymer https://www.polymer-project.org/

    Is a polyfill library to bring Web Components standards to different browsers that do not support them natively yet. In addition to implementing the current version of the standards Polymer adds a few things of its own that are not yet in the standards and may be even never included there. So we can say that Polymer is a library based on the Web Components standards, but like React it is also not a framework.

  • Angular https://angularjs.org/

    Unlike the previous three, this is a true opinionated framework that to a large extent dictates (for better or for worse, depends on your viewpoint) how a Web app should be structured and in what exact way certain things should be done. There is still some flexibility but most of the time you just should do things Angular way. It also allows to create reusable components, but those components will be reusable only in another Angular app (like those made with React will be reusable only in React apps, more discussion on the topic of interoperability later in the article).

Of course we can cover other frameworks and libraries and even venture to create some site similar to http://todomvc.com/, this time not for comparing the MVC implementations but support for componentization. If somebody would like to create such a site, feel free to fork and extend the repository with examples from the present article https://github.com/antivanov/ui-components as a good starting point. We will, however, focus only on those libraries/frameworks listed above as a few different examples should already give a good feeling of the way things can be done and we can already have some meaningful discussion and comparison.

Need of Componentization

So why do we need componentization?

You might have heard about domain-specific languages (DSLs) http://martinfowler.com/books/dsl.html and such before in other areas of software development, not necessarily front-end or Web. In brief, the main idea is that in order to solve some challenging problem it often pays off to first create a language in which this problem is easily solvable. Then having this language allows you to describe the system and its behavior much easier. One good example of a DSL is SQL query language that provides a convenient way to manipulate and query data stored in a relational database. If we try to do such data manipulation and queries in plain code we mignt end up in a world of pain and maintainability nightmare if our data schema and queries are complex enough. And SQL just allows us to express what we want to do with data in a very succinct and declarative fashion.

The idea is that, as Web applications become more complex, they are in many respects not that different from other applications and can certainly benefit from creating DSLs. In fact HTML is already such a DSL, albeit quite a low level and general purpose one. Of course, HTML5 introduces some new semantic tags such as <section>, <header>, <footer>, etc. but this is still not high enough level of abstraction if you develop a large app. What we would probably like to have is to operate with more high level things, in the case of a Web store this might be: <cart>, <searchbox>, <recommendation>, <price>, etc. It looks like it can be nice and beneficial to be able to extend the default HTML vocabulary.

Naturally, if your app is quite simple and is just a couple of simple pages you may not need componentization, abstraction and code reuse so much. Compare this to the case when you need to write some simple script in, say, Python, then you may not need to define any classes or even functions in that script. But still, it is nice to have the ability to create reusable abstractions (functions, classes) when there is a genuine need for them. Components in a Web app are not all that different from functions or classes in many programming languages in this regard.

The obvious benefits of creating and using components are better maintainability, code reuse and speed of development once you have a comprehensive set of components developed for your app. Components are like building blocks from which you can build your apps. If those blocks are well-designed, you can just quickly throw together some functionality that before would require a lot of tedious boiler-plate coding and repetition. Same as with functions and classes, but just on a bit different level.

Hopefully, by now you are becoming convinced (if you were not before) in the potential usefulness of components and would like to know more about the technical details. So far our discussion has been a bit abstract and philosophical, so it is right about time to delve into examples and see how this all is implemented in practice.

Examples

We chose to implement a simple Breadcrumbs component using different technologies listed above, the demo is available at http://antivanov.github.io/ui-components

The source code can be found at https://github.com/antivanov/ui-components, feel free to check it out, fork it and maybe suggest some improvements, just create a pull request.

In the next few sections we will delve deeper into various frameworks and libraries and will explain some of the code in the examples.

Web Components

We will start with Web Components, a set of evolving standards and best practices that allow to create and use custom HTML elements. First, let’s quickly go over some of the standards. The example code https://github.com/antivanov/ui-components/tree/master/WebComponents/breadcrumbs

HTML imports

Allows to include HTML documents into other HTML documents. In our example we include breadcrumbs.html into breadcrumbs.demo.html by inserting the following import into the latter:

<link rel="import" href="breadcrumbs.html">

That’s pretty much all there is to it. There are, of course, some further details such as how we avoid including the same file twice, detecting circular references, etc. you can read more here http://webcomponents.org/articles/introduction-to-html-imports/

Custom elements

Our Breadcrumbs component is implemented as a custom HTML element, that we register as follows:

    document.registerElement('comp-breadcrumbs', {
      prototype: prototype
    });

where prototype is some object which defines what methods and fields will be available on a Breadcrumbs instance that we create like this:

var breadcrumbsElement = document.createElement('comp-breadcrumbs');

We also could have just used this new custom element in the HTML markup and it would have been instantiated just like the rest of the HTML elements, more examples http://webcomponents.org/tags/custom-elements/

Shadow DOM

Custom element can have shadow DOM associated with it. The elements belonging to this shadow DOM are encapsulated inside this custom element, are hidden and considered to be the implementation details of the element. Some predefined HTML elements have shadow DOM as well, for example <video>. When we want to specify that Breadcrumbs element should have some shadow DOM associated with it, we create a shadow root and add some DOM element to it:

this.createShadowRoot().appendChild(element);

Shadow DOM allows to avoid revealing component implementation details on the HTML level to other components and client code using this component. This results in the HTML being more modular and high level. More on Shadow DOM http://webcomponents.org/articles/introduction-to-shadow-dom/

HTML templates

Finally it is possible to use templates, a special <template> tag is introduced for this purpose. In our example in breadcrumbs.html:

<template id="breadcrumbs-template">
  <style>
    ...
    .crumb {
      border: 1px solid transparent;
      border-radius: 4px;
    }
    ...
  </style>
  <div class="breadcrumbs">
  </div>
</template>

Our template also includes some styling information that will be applied only to the HTML created from this template. In this manner templates also enable hiding CSS implementation details and provide for better encapsulation of styles.

The contents of the template are not active until HTML has been generated from this template: images will not be fetched, scripts will not be executed, etc.

There is no data binding support, template is just a piece of static HTML.

In order to create an element from template, we first should import template DOM node into the current document:

var element = document.importNode(template.content, true);

More details http://webcomponents.org/articles/introduction-to-template-element/

Breadcrumbs example

The Breadcrumbs example demonstrates how these different standards can be used together to create a reusable component which, as we noted, will be implemented as a custom element. Let’s look at the code of breadcrumbs.html:

<template id="breadcrumbs-template">
  <style>
    .crumb,
    .crumb-separator {
      padding: 4px;
      cursor: default;
    }
    .crumb {
      border: 1px solid transparent;
      border-radius: 4px;
    }
    .crumb:hover,
    .crumb:focus {
      background-color: #f2f2f2;
      border: 1px solid #d4d4d4;
    }
    .crumb:active {
      background-color: #e9e9e9;
      border: 1px solid #d4d4d4;
    }
    .crumb:last-child {
      background-color: #d4d4d4;
      border: 1px solid #d4d4d4;
    }
  </style>
  <div class="breadcrumbs">
  </div>
</template>
<script>
  (function() {

    function activateCrumb(self, crumb) {
      var idx = parseInt(crumb.getAttribute('idx'));
      var newPath = self.path.slice(0, idx + 1);

      if (newPath.join('/') != self.path.join('/')) {
        var event = new CustomEvent('pathChange', {
          'detail': newPath
        });
        self.dispatchEvent(event);
      }
    }

    function renderPath(self, path) {
      var maxEntries = parseInt(self.getAttribute('maxEntries')) || -1;
      var renderedDotsSeparator = false;

      while(self.container.firstChild) {
        self.container.removeChild(self.container.firstChild);
      }
      path.forEach(function(pathPart, idx) {

        //Skip path entries in the middle
        if ((maxEntries >= 1) && (idx >= maxEntries - 1) 
          && (idx < path.length - 1)) {

          //Render the dots separator once
          if (!renderedDotsSeparator) {
            self.container.appendChild(
              createDotsSeparator(path, maxEntries)
            );
            self.container.appendChild(createCrumbSeparator());
            renderedDotsSeparator = true;
          }
          return;
        }

        self.container.appendChild(createCrumb(pathPart, idx));
        if (idx != path.length - 1) {
          self.container.appendChild(createCrumbSeparator());
        }
      });
    }

    function createDotsSeparator(path, maxEntries) {
      var crumbSeparator = document.createElement('span');
      var tooltipParts = path.slice(maxEntries - 1);

      tooltipParts.pop();

      var tooltip = tooltipParts.join(' > ');

      crumbSeparator.appendChild(document.createTextNode('...'));
      crumbSeparator.setAttribute('class', 'crumb-separator');
      crumbSeparator.setAttribute('title', tooltip);
      return crumbSeparator;
    }

    function createCrumb(pathPart, idx) {
      var crumb = document.createElement('span');

      crumb.setAttribute('class', 'crumb');
      crumb.setAttribute('tabindex', '0');
      crumb.setAttribute('idx', idx);
      crumb.appendChild(document.createTextNode(pathPart));
      return crumb;
    }

    function createCrumbSeparator() {
      var crumbSeparator = document.createElement('span');

      crumbSeparator.appendChild(document.createTextNode('>'));
      crumbSeparator.setAttribute('class', 'crumb-separator');
      return crumbSeparator;
    }

    var ownerDocument = document.currentScript.ownerDocument;
    var template = ownerDocument.querySelector('#breadcrumbs-template');
    var prototype = Object.create(HTMLElement.prototype);

    prototype.createdCallback = function() {
      var self = this;
      var element = document.importNode(template.content, true);

      //Current path
      this.path = [];

      //Crumbs container
      this.container = element.querySelector('.breadcrumbs');
      this.container.addEventListener('click', function(event) {
        if (event.target.getAttribute('class') === 'crumb') {
          activateCrumb(self, event.target);
        }
      }, false);
      this.container.addEventListener('keypress', function(event) {
        if ((event.target.getAttribute('class') === 'crumb') 
            && (event.which == 13)) {
          activateCrumb(self, event.target);
        }
      }, false);
      this.createShadowRoot().appendChild(element);
    };
    prototype.setPath = function(path) {
      this.path = path;
      renderPath(this, path);
    };
    document.registerElement('comp-breadcrumbs', {
      prototype: prototype
    });
  })();
</script>

In lines 1-28 we define the template and CSS styles that will be used for the component. The JavaScript code of the component is contained inside the <script> tags and we register the custom element comp-breadcrumbs in lines 137-139. During registration as an argument we pass a prototype object that contains fields and methods that will be attached to a new element instance once it is created. Let’s go over these methods in more detail.

133-136 the component exposes method setPath that can be called by the client code directly on the DOM comp-breadcrumbs element. Here we just remember the path passed as an argument and re-render the component.

107-132 is the most interesting part as we define the createdCallback which is a predefined hook method that is called when a custom element is created. In lines 107-108 we do some hoops to get to the template we just defined, it is a bit tricky to do since the current document when we load breadcrumbs.html is a different document: breadcrumbs.demo.html. In 109 we inherit from HTMLElement. 113 import the node to the current document and in line 131 create shadow root and add the imported template to it. The lines 116-130 attach some listeners and define initial values for fields.

44-105 deal with rendering the current path as a set of crumbs, crumb separators and dots to the shadow DOM of the current instance of comp-breadcrumbs. Here we do not use any libraries like jQuery which might have shortened some of the DOM element creation boilerplate. In line 45 we check the value of the maxEntries attribute and if it is set we make sure that we render dots instead of extra breadcrumbs.

Note how we have to handle data-binding all by ourselves and make sure that the changes in the state of the component are properly reflected in the generated HTML (view). This feels a bit low-level and tedious, certainly we could use some library or framework for this task, but more on this later.

32-42 we define a handler which is triggered whenever a particular crumb is activated, either by clicking on it or pressing Enter. In lines 37-40 we create and dispatch custom pathChange event so that the client code can listen for this event and act accordingly, for example, in response navigate to a certain page inside the app.

A very nice thing is that with our new custom element we can just use all the familiar DOM APIs and the event system we already know: getAttribute, createElement, querySelector, addEventListener, etc. will just work like with other non-custom HTML elements. Also all the nuances of custom element implementation are well-hidden from its users and they can deal with the component as if it were just like any other normal DOM element, which provides for excellent encapsulation and does not lock us into using some particular library or framework together with our custom elements.

How to use in your project

Some browsers do not yet support all of these standards and although Web Components is definitely the future way of creating reusable components, while it still evolves and is being adopted you have to use something else. The first closest option to consider is Polymer, a library that brings Web Components support to all browsers and adds some of its own features on top. Arguably even in the future when all browsers support Web Components and the standards have matured a lot, you will still have to use some higher level library, because standards tend to stay quite generic and low level in order not to overburden the browser developers with more features to support and also leave some flexibility for library developers.

Polymer

One library you may use to add Web Components support to your apps is Polymer https://www.polymer-project.org. It enables Web Components for browsers that do not yet support corresponding standards. For example, with minimal changes we can make our Breadcrumbs custom element work in Firefox just like in the previous example it used to work in Chrome. However, some things will still not work quite the way we would like them to. For example, since there is no shadow DOM implementation yet in Firefox the DOM elements generated by our custom element will be added directly to the DOM and will not be hidden from the client code. The example http://antivanov.github.io/ui-components/Polymer/breadcrumbs/breadcrumbs.demo.html, source code https://github.com/antivanov/ui-components/blob/master/Polymer/breadcrumbs/breadcrumbs.standard.only.html

Let’s quickly go over a few changes we have to make. The parts common with the Web Components example are omitted for brevity’s sake:

<link rel="import" href="../bower_components/polymer/polymer.html">

<polymer-element name="comp-breadcrumbs" tabindex="0">

<template id="breadcrumbs-template">
  <style>
    ...
    .crumb {
      border: 1px solid transparent;
      border-radius: 4px;
    }
    ...
  </style>
  <div class="breadcrumbs">
  </div>
</template>
<script>
  (function() {
    ...
    var prototype = {};

    prototype.path = [];
    prototype.domReady = function() {
      var self = this;

      //Crumbs container
      this.container = this.shadowRoot.querySelector('.breadcrumbs');
      this.container.addEventListener('click', function(event) {
        if (event.target.getAttribute('class') === 'crumb') {
          activateCrumb(self, event.target);
        }
      }, false);
      this.container.addEventListener('keypress', function(event) {
        if ((event.target.getAttribute('class') === 'crumb') 
            && (event.which == 13)) {
          activateCrumb(self, event.target);
        }
      }, false);
      renderPath(this, this.path);
    };
    ...

    Polymer('comp-breadcrumbs', prototype);
  })();
</script>
</polymer-element>

In line 1 we import the Polymer library using familiar HTML import feature. First difference with the pure Web Components example is noticable in the lines 3 and 46: we wrap the <script> and <template> definitions inside <polymer-element> for which we also specify tabindex attribute so that our custom element can be focused from keyboard using the Tab key.

In line 20 the prototype of the custom element is just an empty object and we do not have to inherit from HTMLElement like before.

We cannot create a real shadow root in many browsers so the Polymer API differs here as well. In line 27 we just query for a fake “shadow root” and at this point our template has already been rendered and the resulting DOM element appended to that root.

Finally in line 43 we register our new custom element with Polymer which also differs from the standard way of doing this.

Besides support for Web Components standards, which are pretty low-level and generic, Polymer also brings in some of its own higher-level features that might make it worth using it even when Web Components support becomes very mainstream and common.

To illustrate some of those features let’s quickly go over another example that also deals with the Breadcrumbs component but uses some Polymer-specific features https://github.com/antivanov/ui-components/blob/master/Polymer/breadcrumbs/breadcrumbs.html Most interesting parts are, as before, where the example differs from the previous one:

<link rel="import" href="../bower_components/polymer/polymer.html">

<polymer-element name="comp-breadcrumbs">

<template id="breadcrumbs-template">
  <style>
    ...
  </style>
  <div class="breadcrumbs" on-keypress="{{_onKeypress}}">
    <template id="crumbs" repeat="{{crumb, index in crumbs}}">
      <span class="{{crumb.dots ? 'crumb-separator' : 'crumb'}}" 
        idx="{{crumb.idx}}" title="{{crumb.tooltip}}" 
        on-click="{{_onActivateCrumb}}" 
        tabIndex="0" >{{crumb.value}}</span>
      <span class="crumb-separator">></span>
    </template>
  </div>
</template>
<script>
  (function() {
    ...

    var prototype = {};

    prototype.path = [];
    prototype.crumbs = [];
    prototype.setPath = function(path) {
      this.path = path;
      this.crumbs = renderPath(this, path);
    };
    ...

    Polymer('comp-breadcrumbs', prototype);
  })();
</script>
</polymer-element>

As can be seen the templating features of Polymer are more advanced than the standard ones Web Components have to offer. For example, in lines 9 and 13 we can bind event handlers to the HTML generated from the template directly in the template code.

Polymer templates are also automatically bound to the state of the current component, for example, see line 14 where we refer to crumb.value pretty much like we would do if we used some template system like Mustache https://github.com/janl/mustache.js

Line 10 demonstrates how we can iterate over model with repeat when generating repetitive HTML markup. Also a very nice feature that saves our effort from doing the same thing in JavaScript on our own as we saw in the previous example.

More information about Polymer templating https://www.polymer-project.org/0.5/docs/polymer/template.html

Another useful thing provided by Polymer, which is not shown in this simple example, is that it exposes in the form of components (well, what else can we expect?) quite a lot of useful functionality that we can reuse when developing our own components. One example of such an useful component made available to us by Polymer is core-ajax https://www.polymer-project.org/0.5/docs/elements/core-ajax.html

And note, for example, how this Progress bar implementation easily extends the core-range component https://github.com/Polymer/paper-progress/blob/master/paper-progress.html All we need to do to take advantage of an already existing Polymer component that we might need, is to include the corresponding extends attribute to the Polymer component declaration as described in the documentation https://www.polymer-project.org/0.5/docs/polymer/polymer.html#extending-other-elements

Existing component libraries

There are quite a few components (called “elements” in the Polymer terminology) developed with Polymer by somebody else that you can consider using on your own project. For example, take a look at http://customelements.io where everybody can publish their components. In addition to that Polymer itself provides quite a few ready to use components right out of the box such as the ones that can be found here https://www.polymer-project.org/0.5/docs/elements/material.html

React.js

While the Web Components standards are still evolving, some libraries try to solve the problem of componentization and code reuse in Web apps in their own way.

One such library is React https://facebook.github.io/react/ Besides support for building reusable components it also tries to solve the view update problem: “React implements one-way reactive data flow which reduces boilerplate and is easier to reason about than traditional data binding”.

We will try to explain how React works, but, if you wish to read more, just feel free to first read the tutorial https://facebook.github.io/react/docs/tutorial.html

Authors of React.js have made a few architectural choices that set it apart from other approaches we are discussing in this article.

First, everything is a component, and to build an app one actually has to first think about how to split the app into components, and then how to compose and nest them. This is quite different from using Web Components where you can just optionally define components if you wish to do so, but you can also use whatever low level HTML and JavaScript you wish together with it. In our React example, even the demo app that uses the Breadcrumbs component is a separate component https://github.com/antivanov/ui-components/blob/master/React.js/breadcrumbs/breadcrumbs.demo.js:

How to define a component, rendering, events, properties and state

var BreadcrumbsDemo = React.createClass({
  getContent: function(path) {
    return path[path.length - 1];
  },
  getInitialState: function() {
    return {
      path: this.props.path
    };
  },
  onPathChange: function(value) {
    this.setState({
      path: value
    });
  },
  reset: function() {
    this.setState({
      path: this.props.path
    });
  },
  render: function() {
    return (
      <div>
        <div id="breadcrumb-container">
          <Breadcrumbs path={this.state.path} maxEntries="5" 
            onChange={this.onPathChange}/>
        </div>
        <div id="content">{this.getContent(this.state.path)}</div>
        <button id="resetButton" onClick={this.reset}>Reset</button>
      </div>
    )
  }
});

var fullPath = ['element1', 'element2', 'element3', 'element4',
  'element5', 'element6', 'element7'];

React.render(
  <BreadcrumbsDemo path={fullPath}/>,
  document.querySelector('#container')
);

The most important part of a component definition is method render in lines 20-31 where the component declaratibely defines how it should be rendered. This can include other components like Breadcrumbs in line 24 and familiar HTML elements like div in line 27.

We can also parameterize the rendition with the component data which can come from two sources: component state and component properties.

Properties of a component should be considered immutable and are passed from a parent component via attributes, like it is done in the line 38 where we pass fullPath to be used with our Breadcrumbs component in the demo. Every component has a parent or is a root-level component like our BreadcrumbsDemo component.

State of a component is something than can be changed during the component lifecycle. Looks like this is a necessary compromise in the design of React to still be able to do local changes to a component without propagating them all the way from the root of the app. However, beware of the state, it should be used very sparingly, and if something can be a property and used by several nested or sibling components, make it an immutable property. Method getInitialState in lines 5-8 is used to define what should be the default initial state of BreadcrumbsDemo. State can be accessed like is demonstrated in line 27 via the state property on the instance of the current component. Setting state is also simple, you just need to call the setState method as it is shown in lines 16-18.

Whenever the state or properties of the current component are changed and they are used in the component rendition, React will re-render component. This is how the view update development challenge is solved by React: it will update the view automatically once you declaratively described in the render method how it should be done.

In fact, since just re-rendering the whole page because of one value update is costly and inefficient, React is very smart about updating only those parts of the page that need to be updated, which is completely hidden from us as developers and is one of the core and most beautiful features of React.

So, in lines 24-25 we create a Breadcrumbs component and pass it this.state.path as the path property which will be accessible in a Breadcrumbs instance via this.props.path.

React components can use special XML-like JavaScript syntax extension for defining what they are rendered to. This extension is called JSX http://facebook.github.io/jsx/ and we just saw what it looks like in lines 22-29 and 38 where we defined a couple of JSX templates.

What about event handling and interactivity? In line 25 we define the onChange attribute, which is part of the Breadcrumbs component public API. Whenever the path changes, the event handler onPathChange from lines 10-14 will be called. In line 28 we define the onClick handler as this.reset so that when the button is clicked we reset the component state in lines 15-19.

You may remember from before that using inline event handlers and having attributes like onClick is considered a bad practice when creating HTML markup, but let’s not rush with any conclusions about React yet. Here it is different since what we are defining in a JSX template is not HTML although it looks a lot like it. Instead, internally, React will create from this template a tree of components, so called virtual DOM, will take care of event handling optimization and use event delegation when needed, and the generated HTML will not contain any inline event handlers. So in the context of React inline event handlers are just the way to go. And the div from line 27 is not actually an HTML element, but a template based on which a React div component will be created in virtual DOM, and this component will then be rendered as an HTML div in real DOM.

Note, how we have two parallel structures that coexist in a React application: real DOM which is what we are used to and virtual DOM, which is a tree of React components. React takes care of rendering the virtual DOM into real DOM and making sure those are in sync with each other.

Going back to Web Components, let’s recall the shadow DOM concept. For Web Components the component tree is in real DOM and implementation details of components such as video are hidden in the shadow DOM pieces attached to real DOM. For React real DOM plays the role of shadow DOM and the component tree, virtual DOM, is just a tree of React components stored in memory. So here we can clearly see certain parallels between Web Components and React.

Breadcrumbs example

Now that we have a better understanding of inner workings of React.js apps let’s revisit our Breadcrumbs example ported to React https://github.com/antivanov/ui-components/blob/master/React.js/breadcrumbs/breadcrumbs.js

First thing we see is how our component is now composed from other components: Crumb and CrumbSeparator. For example we can have a structure like this:

  • Breadcrumbs
    • Crumb
    • CrumbSeparator
    • Crumb
    • CrumbSeparator
    • Crumb

In other words, Breadcrumbs is just a sequence of interleaving Crumb and CrumbSeparator components. So in a way it is a more formal definition of what a Breadcrumbs is and is much closer to how we perceive it in the app.

var Crumb = React.createClass({
  activate: function() {
    this.props.onSelected(this.props.idx);
  },
  onKeyPress: function(event) {
    if (event.nativeEvent.which == 13) {
      this.activate();
    }
  },
  render: function() {
    return (
      <span className="crumb" tabIndex="0" onKeyPress={this.onKeyPress}
        onClick={this.activate}>{this.props.value}</span>
    )
  }
});

var CrumbSeparator = React.createClass({
  render: function() {
    return (
      <span className="crumb-separator"
        title={this.props.tooltip}>{this.props.value}</span>
    )
  }
});

var Breadcrumbs = React.createClass({
  onSelected: function(idx) {
    if (idx < 0) {
      return;
    }
    var newPath = this.props.path.slice(0, idx + 1);

    if (newPath.join('/') != this.props.path.join('/')) {
      this.props.onChange(newPath);
    }
  },
  render: function() {
    var self = this;
    var path = this.props.path;
    var maxEntries = this.props.maxEntries || -1;
    var hasShortened = false;
    var crumbs = [];

    path.forEach(function(pathPart, idx) {

      //Skip path entries in the middle
      if ((maxEntries >= 1) && (idx >= maxEntries - 1) 
        && (idx < path.length - 1)) {

        //Render the dots separator once
        if (!hasShortened) {
          var tooltipParts = path.slice(maxEntries - 1);

          tooltipParts.pop();
          crumbs.push(
            <CrumbSeparator value="..." key={idx}
              tooltip={tooltipParts.join(' > ')}/>,
            <CrumbSeparator value=">" key={path.length + idx}/>
          );
          hasShortened = true;
        }
        return;
      }
      crumbs.push(
        <Crumb idx={idx} value={pathPart} key={idx}
          onSelected={self.onSelected}/>
      );
      if (idx != path.length - 1) {
        crumbs.push(
          <CrumbSeparator value=">" key={path.length + idx}/>
        );
      }
    });

    return (
      <div className="breadcrumbs">
        {crumbs}
      </div>
    );
  }
});

CrumbSeparator component in lines 18-25 is quite simple, it does not have any interactivity and just renders into a span with a supplied tooltip and text content.

Crumb in lines 1-16 has some handling for key presses and clicks. In lines 2-4 we call the function this.props.onSelected with the index of the current crumb this.props.idx, both properties have been supplied by the parent Breadcrumbs components in the lines 66-67.

The Crumb and CrumbSeparator components are quite self-contained and simple, yet they hide some of the low-level details from the Breadcrumbs implementation and can be easily composed into a Breadcrumbs component.

In line 67 we specify that onSelected function from lines 28-37 should be called whenever a Crumb child component is selected. In onSelected we just check if the path has changed compared to what Breadcrumbs received in its properties in line 34, and then call the supplied onChange handler in line 35. As you might remember we defined this handler as a property on the current Breadcrumbs instance earlier in BreadcrumbsDemo.

Then the implementation of the render function in lines 38-80 repeats the logic we already saw in earlier examples for Polymer and Web Components. We can construct the JSX template dynamically in lines 66-67, 70-71 and inline parts of it later in line 78. Lines 48-64 deal with the case when the Breadcrumbs component has a specified maxEntries property.

Note, how the example is simpler and cleaner than what we did before even with Polymer. This is because quite many low-level details such as rendering templates and binding data to the views are done for us by React which seems to be a nice bonus to componentization we get.

Key points, philosophy behind React.js

Let’s outline some of the keypoints that the example above demonstrates, we will re-iterate some of them a bit later when we discuss how different componentization approaches relate to each other.

React is a view only library that solves the challenge of binding data to view and creating reusable components. Data is transformed by React into a component tree and then this tree is transformed into HTML.

Every React component can be viewed as a function that takes some arguments via its properties and returns (from the render method) a new value that can include some other React components or React equivalents of HTML elements such as <div>.

Composing your app from React components is quite similar to composing a program from functions. React encourages a functional style where component definitions are declarative and handles the low-level details of how to make this functional definition of an app work efficiently. Feel free to read more about functional programming http://en.wikipedia.org/wiki/Functional_programming

When looking at React one can clearly see certain similarities with a domain specific language for solving a specific problem created in Lisp http://en.wikipedia.org/wiki/Lisp_%28programming_language%29. Just the brackets are a bit different, instead of () it is <> and React is not a general purpose language, but just a view library.

As JavaScript was in part inspired by Scheme (dialect of Lisp) http://en.wikipedia.org/wiki/Scheme_%28programming_language%29 and gives a lot of attention and flexibility to functions, React feels quite natural to use and is following the underlying language philosophy in this regard.
It is very easy to compose and nest functions in JavaScript, and so it is easy to compose and nest components in React. React does not try to redefine JavaScript or impose its own vision of the language like Angular to some extent does as we will see in the next section.

But JavaScript is not quite a functional language unlike, for example, Haskell, due to the presence of mutable shared state, so we have to take extra measures when using React to make sure that we do not modify things such as component properties, and more development discipline and effort is required in this respect than if React were to use a real functional language.

React provides a declarative, functional and powerful mechanism of composition and abstraction and is conceptually quite simple because of this.

One minus is that React is non-standard, does things in its own way, and the components we create will be reusable only in React apps. Although React is much less intrusive than, say, Angular and does not dictate how the whole app should be structured. Instead it focuses on only a few things: componentization and view updates.

Another minor minus is that CSS is still not modular, and unlike in Web Components, styles live completely separately from the JavaScript part of the app.

Flux

In addition to the view part represented by React, one can also choose to follow the default app arhitecture recommended for it. This architecture is called Flux https://facebook.github.io/flux/ and ensures that the data flows to your React components in an organized manner via one control point. React itself just defines how data should be transformed into HTML, and does not say much about what should be the data lifecycle in the app, Flux tries to complement this gap. But, of course, you can also choose any MVC framework you like and use it with React.

Existing component libraries

You can search for React components here http://react-components.com/ or use React Bootstrap http://react-bootstrap.github.io/components.html or React Material https://github.com/SanderSpies/react-material

Angular.js

Another way to solve the componentization challenge is to use Angular, a full-fledged framework for building modern Web apps. Like React it allows to easily create and compose you application from reusable components, unlike React this is not its main feature, and it is not as emphasized, you can even have an app written with Angular and no reusable components at all. Although the documentation https://angularjs.org/ explicitly states that “AngularJS lets you extend HTML vocabulary for your application.” far too many apps written with Angular that I saw completely ignore this feature, so hopefully our discussion of how and why we should create components with Angular might be useful for some Angular developers as well.

In Angular components can be defined using directives, and directives can be used not only to create components but also for many other things. We will briefly remind what directives are below. Also Angular deals with routing, data flow, has far more concepts to grasp, and has a much stronger focus on testability. Creating components and view updates is only a part of what Angular is all about, and the philosophy behind those is a bit different from what we have just discussed. Let’s quickly go over some of the Angular features that we will utilize in our example.

Directives

Directives are special markers that can be attached to HTML elements in the form of attributes or CSS classes, or they can even be HTML elements themselves. The last case is the most interesting one for us as directives in the form of HTML elements behave a lot like custom HTML elements that we already saw in Web Components. More information https://docs.angularjs.org/guide/directive

Simple example:

<body ng-app="BreadcrumbsDemo" ng-controller="Path">

Directive ng-app defines a new Angular app and the root element for it. Another directive ng-controller binds controller named Path to the part of the DOM rooted in the HTML element on which the directive is used.

Directives are a bit like annotations on DOM, they can have a meaning that we can define for them, and then Angular will interpret our directive definitions and enhance the DOM with the specified behavior and elements. There are a few predefined Angular directives, two of which we just saw in use, but also we can define our own, and, in fact, this is the mechanism we will be using to create our own custom Breadcrumbs component.

Controllers and scopes

Controller https://docs.angularjs.org/guide/controller is a piece of code that is associated with some part of HTML by using ng-controller directive. In our example https://github.com/antivanov/ui-components/blob/master/Angular.js/breadcrumbs/breadcrumbs.demo.html:

<body ng-app="BreadcrumbsDemo" ng-controller="Path">
  <div id="breadcrumb-container">
    <comp-breadcrumbs path="path" max-entries="5"
      on-change="onPathChange(path)"></comp-breadcrumbs>
  </div>
  <div id="content">{{path[path.length - 1 ]}}</div>
  <button id="resetButton" ng-click="reset()">Reset</button>
</body>

In line 1 we bind our Path controller to the document body. Every controller has a scope associated with it, which is another core Angular concept. In this example the scope of the Path controller is bound to the body element as well. We refer to the variable path stored in this scope in line 6, and in line 4 we bind the function onPathChange from the same scope to the on-change attribute of the Breadcrumbs comp-breadcrumbs directive we will define a bit later. We also pass to the Breadcrumbs instance in line 3 path from the controller’s scope and define max-entries for it as 5. Finally, in line 7 we specify that the reset function from the scope should be called when resetButton button is clicked.

And here is the code for the controller that adds the mentioned values and functions to its scope:

    var app = angular.module('BreadcrumbsDemo', ['Components']);

    app.constant('fullPath',
      ['element1', 'element2', 'element3',
       'element4', 'element5', 'element6', 'element7'])
    .controller('Path', function Path($scope, fullPath) {
      $scope.reset = function() {
        $scope.path = fullPath;
      };
      $scope.onPathChange = function(path) {
        $scope.path = path;
      };
      $scope.reset();
    });

In line 6 we inject constant fullPath and $scope into the Path controller. The concept of dependency injection or DI originates from the Java world and there it is used among other things to ensure that we explicitly specify dependencies for every piece of code we use and also that we can easily substitute those dependencies in unit tests with some mocks or stubs. Here, DI also helps to make our JavaScript code more testable and forces us to be more explicit about what dependencies our controllers have. Testability is one of the nicest features of Angular built into it from the very beginning.

Then in lines 7-13 we just set some values in the scope. Just like React Angular will take care of properly rendering and updating the view given the values we put into the scope, also it will register event listeners for us. Here we see how the view update challenge is solved by Angular. But unlike React, we can refer to parent scopes in the markup and also we have to take extra care when propagating value updates from upper scopes downwards the controller/scope hierarchy. On this example it is not quite visible since it has only one controller.

In React as you remember we had a tree of components, nested and composed with each other, in Angular we rather have a tree of controllers and associated scopes nested inside of each other. And controller does not know much about the view part unlike React components.

In fact dealing with those nested scopes and controllers in Angular, updating them in proper order and understanding what scope you are dealing with at each particular moment can be quite confusing and challenging. So at least in this respect React seems to be simpler.

This may already sound a bit complicated, but we are not quite finished with the scopes yet, because now we will take a look at our Breadcrumbs component https://github.com/antivanov/ui-components/blob/master/Angular.js/breadcrumbs/breadcrumbs.js which, like we said before, is just a directive that uses a custom tag name. For this directive there will be two more scopes: one associated with the directive itself and one with the controller of the directive.

var components = angular.module('Components', []);

components.controller('breadcrumbsController', function ($scope) {

  function adaptForRendering(path, maxEntries) {
    maxEntries = maxEntries || -1;
    var hasShortened = false;
    var shortenedPath = [];

    path.forEach(function(pathPart, idx) {

      //Skip path entries in the middle
      if ((maxEntries >= 1) && (idx >= maxEntries - 1) 
        && (idx < path.length - 1)) {

        //Render the dots separator once
        if (!hasShortened) {
          var tooltipParts = path.slice(maxEntries - 1);

          tooltipParts.pop();
          shortenedPath.push({
            value: '...',
            dots: true,
            tooltip: tooltipParts.join(' > ')
          });
          hasShortened = true;
        }
        return;
      }
      shortenedPath.push({
        value: pathPart,
        index: idx
      });
    });
    return shortenedPath;
  }

  $scope.activatePathPart = function(pathPart) {
    $scope.pathSelected(!pathPart.dots ? pathPart.index : -1)
  };

  $scope.pathSelected = function(idx) {
    if (idx < 0) {
      return;
    }
    var newPath = $scope.path.slice(0, idx + 1);

    if (newPath.join('/') != $scope.path.join('/')) {
      $scope.onChange({
        path: newPath
      });
    }
  };

  $scope.pathToRender = adaptForRendering($scope.path,
    $scope.maxEntries);
  $scope.$watchCollection('path', function(path) {
    $scope.pathToRender = adaptForRendering(path, $scope.maxEntries);
  });
}).directive('compBreadcrumbs', function () {
  return {
    restrict: 'E',
    scope: {
      path: '=',
      onChange: '&onChange',
      maxEntries: '='
    },
    controller: 'breadcrumbsController',
    templateUrl: 'breadcrumbs.tpl.html'
  };
});

In lines 60-70 we define a new compBreadcrumbs directive, an instance of which will be created once we use <comp-breadcrumbs> markup in our Angular app. In line 62 with restrict: ‘E’ we specify that the directive can be used only as a custom HTML element. In line 69 we specify the template to be used to generate HTML elements for our directive and in line 68 that controller breadcrumbsController should be used, an instance of which will be created for every instance of our directive.

Lines 63-67 define the isolated scope of the directive and how it is connected with the enclosing scope in which the directive is used. In line 64 we bind path to the path attribute of the directive as it is used in the app markup, and in line 66 we bind maxEntries to the maxEntries attribute. In line 65 we use &onChange so that the onChange function stored in the isolated scope of the directive will be always invoked in the context of the enclosing scope in which the directive is used. This enclosing scope is the scope of the Path controller we saw before.

The behavior of the directive is specified in the controller we use inside it in the lines 3-60.

In lines 38-53 we define the functions that are triggered whenever an individual crumb is activated. When the path should change, like in the earlier examples with Web Components and React, we just call the function provided to the component from the outer scope in lines 49-51. There are quite a few other options to notify the controller from a directive inside it, but we will omit those to keep the discussion of Angular a bit shorter.

In lines 57-59 we specify that Angular should watch the scope for changes in the path and whenever they occur we should update the scope value pathToRender by calling adaptForRendering with path as argument. pathToRender as we will shortly see is referenced in the template of the directive.

In lines 5-36 the crumbs and crumb separators are generated based on the provided maxEntries and path values, but this is not where they are rendered, so the method is called prepareForRendering rather than render. The rendering will happen when the template of the directive will be rendered https://github.com/antivanov/ui-components/blob/master/Angular.js/breadcrumbs/breadcrumbs.tpl.html.

<div class="breadcrumbs">
  <span tabindex="{{pathPart.dots ? '' : '0'}}"
    ng-class="{'crumb':!pathPart.dots,'crumb-separator':pathPart.dots}"
    ng-click="activatePathPart(pathPart)"
    ng-keypress="($event.which === 13) && activatePathPart(pathPart)"
    ng-attr-title="{{pathPart.tooltip ? pathPart.tooltip : ''}}"
    ng-repeat-start="pathPart in pathToRender">{{pathPart.value}}</span>
  <span class="crumb-separator" 
    ng-if="$index < pathToRender.length - 1"
    ng-repeat-end>></span>
</div>

In line 7 ng-repeat-start specifies that we iterate over elements pathPart in pathToRender and for each such pathPart we render a span which, depending on whether pathPart.dots is true or false, has either class crumb-separator or just crumb.

In line 4 we say that whenever a crumb is clicked activatePathPart will be called with the corresponding pathPart. Pressing Enter is handled in a similar way in line 5. In line 6 we use ng-attr-title directive on the current crumb or crumb separator if there is a tooltip for the current pathPart.

Note how in this template we can also use directives inside directives in Angular.

To finish our discussion about scopes in regards to the Breadcrumbs component, if you were looking carefully, now we have 3 scopes in total (like we noted before it might get a bit complicated at times).

First scope is the scope of the Path controller in which the component is used. Next scope is the isolated scope of the component’s directive itself. This isolated scope has as its enclosing scope the scope of the Path controller. In addition to that we also use a controller breadcrumbsController inside our directive that has yet another scope associated with it, and this scope has as its parent scope the enclosing scope of the directive. So there are 2 different scopes used in the Breadcrumbs component and one more enclosing scope for the directive. Easy to be confused, so don’t despair and browse the Angular documentation if something is not quite clear about the scopes (most probably it is not if this is the first time you deal with Angular).

Key points, philosophy behind Angular.js

Angular is a framework that suggest its own very opinionated and conceptually distinct way of developing front end for Web apps. It may be quite advantageous to use it if you are looking for something to quickly prototype your app or get up and running fast without getting mired into wiring different libraries and frameworks together.

One significant minus can be that, in a way, Angular just provides a set of tools for you to develop your Web app with, but the most interesting part, how you can use all those tools together, is not always obvious. This seems to slowly change and even the Angular documentation now includes some of the best practices, but you still may constantly find yourself asking the questions like “How should it be done in Angular? What is the best way conceptually?”. And the set of tools that Angular provides may not be the easiest one as well, as it includes quite many of different concepts: scopes, isolated scopes, directives, controllers, nesting, updates, dependency injection, services, factories, constants, etc.

A huge plus is built-in testability, provided for by explicitly specifying which dependencies every controller or directive requires. The view update challenge is also solved nicely, eliminating a whole class of bugs when the view and model in a Web app are out of sync. However, due to not always obvious complex scope nesting and update propagation between different models there can still be some challenges there.

Rendering in Angular is a bit more removed from the controllers as we saw in our simple Breadcrumbs example. The result of this is that the code gets a bit more complicated as there is a bit artificial boundary between the data and markup into which this data is transformed.

Like we noted before, with Angular you may even opt not to use custom directives in your app at all, instead of this building everything with controllers. In a way, this is bad, because it does not encourage you to reuse your code as much as you can, since a Web app is not just a set of modular JavaScript “classes” which controllers essentially are, but rather a set of components that have both the behavior, markup and styles associated with them.

Angular is clearly inspired by Java concepts and brings some of the complexities and patterns associated with enterprise Java development to the JavaScript world. Factories, services, dependency injection – it sounds a lot like a Java app. It might also be a bit contrary to the JavaScript core philosophy of keeping things simple and centered around functions. Instead Angular is centered around class-like objects and patterns and tries to redefine the commonly accepted JavaScript development practices radically. Whether this is a good or a bad thing depends on your personal taste, but some people feel that programming in Angular feels much less like usual programming using JavaScript.

Like with React we can note that the HTML generated by Angular directives plays the role similar to shadow DOM for Web Components, and the tree of Angular components is then analogous to real DOM.

I would encourage you to create reusable components with Angular by using its directives when it is appropriate, this will lead to a better structured app and more code reuse. For some reason this is what many people choose not to do on Angular projects and this seems to be not quite right.

Existing component libraries

There are quite a few existing component libraries, for example https://angular-ui.github.io/bootstrap/ and https://material.angularjs.org/#/

Why not jQuery?

At this point you may be asking: OK, we can create components using all these new libraries, standards and frameworks, but couldn’t we already just do that much earlier with jQuery? In fact, how about jQuery UI https://jqueryui.com/?

To be fair to jQuery we will also provide our Breadcrumbs example implemented as a jQuery plugin and it will actually look just fine. The problems with creating components as jQuery plugins will become visible only when we try to create a few of them and wire them together in a complex app. This is where jQuery plugins miserably fail and do not scale.

If you look at a typical jQuery plugin, it can be used by its client code something like this https://github.com/antivanov/ui-components/blob/master/jQuery/breadcrumbs/breadcrumbs.demo.html:

      var $breadcrumbs = $('#breadcrumb-container').breadcrumbs({
        'maxEntries': 5,
        'path': fullPath
      });

Which essentially will just add a few HTML elements and some state and behavior to them. Unfortunately, there is no good way to interact with the app in which we create a component. A possible workaround could be to use custom jQuery events:

      $breadcrumbs.on('pathChange', function(event, path) {
        $breadcrumbs.trigger('setPath', [path]);
        $content.text(path[path.length - 1]);
      });

but this is not scalable and isolated enough as we will have to create lots of custom events which will be propagating in our app back and force between different components.

How about creating a nested jQuery plugin and interacting with it from the client app? No, it can be done with some effort, and may not even look that bad, but this is not what jQuery plugins were initially designed for.

jQuery plugin system is geared towards creating isolated rich widgets which extend your app in a patchy manner, but when it comes to interaction between those widgets or organizing them together into a whole we immediately run into difficulties, so the jQuery approach does not scale in this sense.

jQuery plugins are just a distant ancestor of Web components. They made their contribution in the past, encouraged creating some useful widgets in their time but are completely unsuitable for modern large Web apps because of the scalability issues.

You can still find things like jQuery UI https://jqueryui.com/ quite useful for some small Web apps and this will probably remain their niche. In this case you just need to patch your page a bit with a couple of jQuery plugins: add a bit of interactivity or to use a few nicely looking widgets. But if you wish to create a full-fledged app with dozens of complex custom components interacting with each other and the rest of the app, then you need something else.

As promised, here is the Breadcrumbs example using jQuery plugin system, it looks a bit like the widgets you can find in jQuery UI and other libraries exposing their widgets as jQuery plugins:

(function ($) {

  $.fn.breadcrumbs = function(options) {
    var self = this;

    options = $.extend({
      maxEntries: -1,
      path: []
    }, options);

    var maxEntries = options.maxEntries;
    var path = options.path;

    var $container = $('<div></div>').attr('class', 'breadcrumbs')
      .appendTo(self);
    $container.on('click', '.crumb', function(event) {
      activateCrumb(self, $(event.target));
    }).on('keypress', '.crumb', function(event) {
      if (event.which == 13) {
        activateCrumb(self, $(event.target));
      }
    });
    renderPath(this, path);

    this.on('setPath', function(event, newPath) {
      path = newPath;
      renderPath(this, path);
    });

    function activateCrumb(self, $crumb) {
      var idx = parseInt($crumb.attr('idx'));
      var newPath = path.slice(0, idx + 1);

      if (newPath.join('/') != path.join('/')) {
        self.trigger('pathChange', [newPath]);
      }
    }

    function renderPath(self, path) {
      var renderedDotsSeparator = false;

      $container.empty();
      path.forEach(function(pathPart, idx) {

        //Skip path entries in the middle
        if ((maxEntries >= 1) && (idx >= maxEntries - 1) 
          && (idx < path.length - 1)) {

          //Render the dots separator once
          if (!renderedDotsSeparator) {
            createDotsSeparator(path, maxEntries)
              .appendTo($container);
            createCrumbSeparator().appendTo($container);
            renderedDotsSeparator = true;
          }
          return;
        }

        createCrumb(pathPart, idx).appendTo($container);
        if (idx != path.length - 1) {
          createCrumbSeparator().appendTo($container);
        }
      });
    }

    function createDotsSeparator(path, maxEntries) {
      var $crumbSeparator = $('<span></span>');
      var tooltipParts = path.slice(maxEntries - 1);

      tooltipParts.pop();

      var tooltip = tooltipParts.join(' > ');

      return $crumbSeparator.attr('class', 'crumb-separator')
        .attr('title', tooltip).text('...');
    }

    function createCrumb(pathPart, idx) {
      return $('<span></span>').attr('class', 'crumb')
        .attr('tabindex', '0').attr('idx', idx).text(pathPart);
    }

    function createCrumbSeparator() {
      return $('<span></span>').attr('class', 'crumb-separator')
        .text('>');
    }

    return this;
  };
}(jQuery));

The code should be more or less self-evident if you are familiar with jQuery, otherwise it is not worth spending more time on covering it as, like we discussed, jQuery is not relevant for our purposes of creating reusable components in large modern Web apps.

Other options

There are still quite a few other options available if you want to create reusable components.

For example, we can mention Ember.js http://guides.emberjs.com/v1.10.0/cookbook/helpers_and_components/creating_reusable_social_share_buttons/.

Another option is Ample SDK http://www.amplesdk.com/tutorials/edg/element/. In fact, Ample SDK back in 2011 was for me the introduction to modern reusable components.

Knockout.js http://knockoutjs.com/documentation/component-overview.html also allows to create custom elements.

The list continues, however, we will not cover the remaining frameworks and libraries in the present article since the ones we already discussed should already give a good feel and exhibit some of the ideas behind component based development.

Different Mental Model

In order to use components in ours apps efficiently, no matter what particular technology we choose to use, a certain change in the way we think about the app structure is required.

React has a good introduction into this new way of thinking “Thinking in React” https://facebook.github.io/react/docs/thinking-in-react.html which could have as well been titled as “Thinking in Components” and is not that React-specific as it might seem at the first glance.

The basic idea is to decompose the structure of your app into simple parts and see how the application is composed from them.

For example for a simple e-mail client:

  • App
    • Header
      • User menu
        • View profile menu item
        • Logout menu item
    • Sidebar
      • Search box
      • Folders
        • Inbox
        • Sent
        • Deleted
    • Content
      • Email List
        • Email item
    • Footer

This rough breakdown gives a general idea what components our application can be composed from.

If not using React you may decide to implement as components only some of the elements of the interface and follow a more traditional approach elsewhere. Good candidates to be components could be, for example, User menu or Folder. You can also decide to have your own List component, based on which the Email List will be implemented.

If it so happens that besides the e-mail client we also need to build, say, a social network with similar interface and controls, we can potentially reuse quite a lot of code by using the already created List, Folder and User menu components.

Like we mentioned before, components are a bit like functions or classes. Splitting your app into small reusable functions or classes does not mean that all of them will be ultimately reused somewhere, but it certainly gives your app a better structure and leads to better maintainability and code reuse. This is precisely what happens here as well, once we analyze and decompose our app structure and create the app out of components.

So it pays off to think in components just like it pays off to think in terms of reusable functions and classes, and, for example, React deems it so important that everything is by default a component.

Putting It All Together

Now it is time to do a brief comparison of different approaches to componentization that were covered in this article. We will also recap some of the key points already occasionally made earlier and maybe a bit hard to spot among all the technical details. We cannot directly compare, for example, Web Components and React since it will be a bit like comparing apples with oranges, instead we will try to give a feeling how all those technologies fit together and what is their relationship to each other.

We started first with Web Components, a set of standards that allows to define and use components in your Web applications and all the familiar standard APIs will just work out of the box. Web Components are not yet widely supported by different browsers and still have a lot of space to mature. Another thing to consider is that the standards are quite low-level and generic in order to give the maximum amount of freedome to client developers and not to overburden browser developers. Then in real life you will probably have to use something on top of Web Components, as this is just a low-level integration mechanism which allows you to plug in your own custom elements into existing HTML vocabulary.

One such higher level library you may choose to use is Polymer. It brings support of Web Components standards to different browsers, adheres to them quite closely, and in addition provides a few useful features of its own, such as more advanced templating and many available components that you can extend. However, Polymer may still not be high-level enough as it still deals with many low-level mechanisms of Web Components standards. To Web Components Polymer is a bit like jQuery was to DOM APIs in its beginning: more syntactic sugar and making sure that everything works consistently among different browsers. You can also easily choose to use Polymer with your favorite framework or other libraries and for some people this may be just what they are looking for.

While Web Components standards are still being developed and adopted by browsers in response to the genuine need for componentization in many modern apps, there sprung up quite a few alternatives which share a very similar philosophy but have a bit different implementation details. Many of those alternatives would construct a separate tree of their own components which they would then render into HTML. We covered probably two most prominent and promising representatives: Angular and React.

React is a library that deals with the view part in the MVC architecture of Web apps. It is centered around components, a tree of which is generated from the supplied data and then is transformed into HTML. The transformation is declarative and functional-like. The resulting DOM seems to a client developer almost as if it were immutable, when in fact React just cleverly hides under the hood some smart techniques for updating only the parts of DOM which really need to be updated. React is conceptually simple and powerful, and you can choose to use it together with the Flux architecture which adds the missing application data flow dimension to your app in a manner consistent with the React philosophy.

Angular appeared before React and is a full-fledged framework. Support for creating components is just one of its many features, unfortunately quite often neglected and not well understood. Nonetheless Angular also allows to create reusable components, although the API is a bit more involved and dealing with different scopes can quickly become a pain. If you are using Angular on your projects, you should consider giving more attention to creating components when appropriate. It seems that now there is some movement in the Angular world to emphasize the role of components (directives) more and even integrate Angular with Web Components, for example, a couple of articles to this extent https://pascalprecht.github.io/2014/10/25/integrating-web-components-with-angularjs/ http://teropa.info/blog/2014/10/24/how-ive-improved-my-angular-apps-by-banning-ng-controller.html

Being non-standard, both React and Angular lock you in into using them, probably React less so since it deals only with the view part and can be used more easily with other libraries. This may be an important consideration for some, but it is quite likely that React and Angular may also choose to be interoperable with Web Components in the future.

In the coming time I would expect that the alternative solutions start to use the Web Components spec or Polymer, first, to leverage the existing standard technology instead of inventing their own workarounds on top of old Web standards and, second, to provide more interoperability with other frameworks and libraries.

It is a bit sad that there are now separate implementations of the same components for all the different frameworks, just think about all that development effort that goes into supporting parallel implementations and the overhead of learning different APIs and approaches. On the other hand this is how things are often done in the JavaScript world and to a certaint extent this may still be a useful overhead: the new much needed features are first pioneered by a few cutting-edge frameworks or libraries, then some standards inspired by them appear, and then there is a certain degree of convergence among those frameworks and libraries to the new standards. But how the things will unfold still remains to be seen in the next few years.

In most cases, at the present moment, I would probably recommend using either React or Angular depending on your taste. But no matter what framework or library you decide to use, do not miss out on leveraging the power of componentization.

Summary

We will close off this article with a bit philosophical discussion. As was noted in the famous book “Structure and Interpretation of Computer Programs” https://mitpress.mit.edu/sicp/full-text/sicp/book/node5.html

A powerful programming language is more than just a means for instructing a computer to perform tasks. The language also serves as a framework within which we organize our ideas about processes. Thus, when we describe a language, we should pay particular attention to the means that the language provides for combining simple ideas to form more complex ideas. Every powerful language has three mechanisms for accomplishing this:

  • primitive expressions, which represent the simplest entities the language is concerned with,

  • means of combination, by which compound elements are built from simpler ones, and

  • means of abstraction, by which compound elements can be named and manipulated as units.

In our case, creating specific components when building a Web app is essentially just creating a form of language in which our application can be easily described and built like we just did above with the e-mail client example. The parallels are clear:

  • primitive expressions – predefined HTML elements and their behavior
  • means of combination – being able to put HTML elements together into a DOM tree and create an HTML document, and maybe also define some additional behavior for those elements by using JavaScript
  • means of abstraction – ability to encapsulate the HTML elements and associated behavior into new HTML elements, creating new abstractions – components

The first two primitive expression and means of combination are available to Web developers for a long time already from the very beginning. The last one means of abstraction is what Web Components and the frameworks and libraries sharing its spirit try to provide only in the last few years. Having the ability to create components allows to build more powerful abstractions when building Web apps and ultimately enables building modern complex Web apps faster and easier.

Even when you talk about Web apps with other people such as designers or users, instead of talking about things such as divs or spans or sections you tend to talk about searchboxes, grids, menus, tabs, shopping carts, bookings, etc. So if you are already using components in your own language, why then not just use them in code, so that the code is closer to how we reason about the app to begin with?

The article turned out to be a bit lengthy as we had to cover quite many things and somewhat different approaches to solving the same problem, but hopefully it was still useful and you may now try to give reusable components a chance on your next project, focus more on them in your development practices and use the related features of your favorite framework or library more confidently and with understanding of the philosophy and ideas behind them.

Links

Deceiving Test Coverage

Contents

What’s your test coverage?
Why we test
Quality of tests
Test coverage
Summary

What’s your test coverage?

If you are a developer and write tests probably you already heard people around you talking about test coverage a lot. Usually it is something like: “we do not have this module covered yet”, “we have 90% test coverage”, “this new class is covered 100%”. It is implied that the higher the test coverage is, the better it is: we are more confident in the code, there are fewer bugs, and the code is well-documented. And you may even get asked from time to time by other developers or wonder yourself what is the test coverage for the code you are currently working on.

Test coverage then seems like a pretty important metric that describes how well our code is tested. At the same time we use this term so often that inevitably we gloss over some important details and can even forget what we are trying to achieve with test coverage to begin with.

This article tries to revisit some of the reasoning behind the test coverage metric and provide a few simple examples that illustrate how we can use this metric and why we should better understand what it really means.

Hopefully, after reading this article you will be a bit more sceptical when somebody claims that the code is “100% tested”, “everything is covered”, “we should try to reach 100% coverage here”, etc. Moreover, you will be able to offer some good arguments and maybe convince others to also be more practical and reasonable when it comes to this metric. And also you will be hopefully having much more meaningful discussions about the quality of the code than just:

– “What’s our test coverage?”
– “It is 100%”
– “Good, it should definitely work”

Why we test

Probably, you were already doing some testing and the topic is quite familiar to you, but still, let’s start again from the very beginning in small baby steps in order to better understand how exactly do we come up with such a metric as test coverage.

We test our code because we want to be sure, at least to some degree, that it works. Every software developer knows that a just written piece of code rarely works as expected when it is first run. Getting from the first version of the code to the working one can involve a few cycles of applying some changes and observing the results in the working code, that is testing the code. If everything is good, than the code is tested and works in the end.

Well, almost, because it turns out that due to the subjectivity of testing by the same person(s) who develop the code they can sometime miss a few errors (known as “bugs”). That’s where testers come in and try to catch those bugs in the code which developers inadvertently left there.

If the testers miss bugs, then it is the turn of users to catch errors in software. Hopefully the users get well-tested and high-quality software, but, as we all know, unfortunately all too often the software we use still has quite a few bugs.

As we want our code to work correctly, ideally we would like to have no bugs in it when we make it available to the users. But this turns out to be a quite challenging task.

For some areas, the cost of error is so high and prohibiting, that finding all the errors and fixing them becomes a must. A good example of this can be software that is installed on a space ship that can cost a lot of money and requires everything to work precisely and perfectly.

For other applications, such as, for example, a video hosting service, the errors are still undesirable, but cost less.

It is all about making a trade-off: more testing means more effort, the cost of the left bugs should be less than the cost of additional testing required to find them.

Another approach is formally proving that some code works and implements specification which in its turn does not have bugs in it to begin with. Testing is quite different. Tests give us confidence, but do not prove completely that the code works, and this is the first important point we want to make in this article and that is often missed by some developers. There is a separate field in Computer Science that focuses on formally proving that programs are correct and some of its methods are even applied practically. We will not be talking about formally proving programs here, but for more information and additional links feel free to start with the following Wikipedia article “Formal verification” in case you have interest.

Often tests are written in the form of executable specifications that can be run by computer which saves a lot of precious human time from doing tedious, repetitive and error-prone work and leaves it to machines that are well-suited precisely for such things.

If tests are written together with the code and before the actual code is written we are talking about test-driven development, or test-first development. This has become quite a popular technique in the last years, but still many people write tests after the code has already been written or, unfortunately, do not write any tests at all. Guess why? Yes, “there is no time for that”, although, surprisingly, it is somehow always possible to later find quite a lot of time to fix all those numerous issues that were missed because of poor testing.

Some articles and practical experience suggests that writing tests for the code, ideally doing test-driven development, in the end saves time and development effort by reducing the number of defects dramatically. Although some bugs still escape and need to be caught by QA later, their number is then not as large as it would have been without tests.

So writing tests and testing code well pays off and makes sense because of the better quality of the resulting software, less stress for developers, more satisfied users and less development effort required to develop and fix the issues.

Quality of tests

Tests are good, as we just have seen and we need them. But there are so many ways to write tests for some piece of code, then how do we know if some set of tests is better than another? Can we somehow measure the quality of our tests and compare different sets of tests with each other?

Good tests are the ones after running which we are quite sure that the code works and the major usage scenarios have been tested or we say “covered”. Good tests should not be more complicated and take more effort to support than the code they test. They should be as independent as possible and allow to trace down a bug from a test failure in a matter of seconds without long debugging sessions. There should not be a lot of duplication, the test code should be well-structured. The tests should be fast and lightweight. etc.

We see that there are quite a few metrics and criteria that we can come up with that will tell us whether our tests are good enough.

Test coverage

Test coverage is just one such simple metric, although probably the most popular one, that allows us to judge whether our “tests are good”. Quite often, and, as we are already starting to see, a bit simplistically, people make this synonymous to “test coverage is good”. Moreover, “test coverage” often means the “line coverage of code by tests” which is quite different from, for example, “scenario coverage by tests” as it can be observed in the following simple example.

The example will be in JavaScript and will use a particular testing framework Jasmine but is not really JavaScript-specific. We just use JavaScript here to make our example real and executable in some environment, and you are free to port it to your favorite language and testing framework as you wish.

Let’s say we want to write a simple function that will return values from some dictionary based on the set of keys that are passed to it.

  var dictionary = {
    "key1": "value1",
    "key2": "value2",
    "key3": "value3"
  };

Let’s write some tests first that specify the desired behavior:

  describe("getValues - full line coverage", function() {

    it("should provide values for requested keys", function() {
      expect(getValues(["key1", "key2", "key3"]))
          .toEqual(["value1", "value2", "value3"]);
    });
  });

The implementation is pretty simple:

  function getValues(keys) {
    return keys.map(function(key) {
      return dictionary[key];
    });
  }

We just convert a list of keys into the list of values with map by replacing each key with a corresponding value from dictionary.

As we can see, each line of our function getValues is executed once and we have the so longed for 100% test coverage. Good job?

Well, let’s pause for a moment and look at an alternative implementation that will make our test pass and will have the same 100% test coverage.

  function getValues(keys) {
    return ["value1", "value2", "value3"];
  }

The implementation is obviously not what we want, because it always returns the same values no matter which keys we pass to the function. Something obviously went wrong with our test coverage metric here because it gave us false confidence in a broken code. And also then our tests are still not good enough as we did not recognize the wrong implementation. Let’s add more tests and be more specific for what behavior we wish.

  describe("getValues", function() {

    it("should provide values for requested keys", function() {
      expect(getValues(["key1", "key2", "key3"]))
          .toEqual(["value1", "value2", "value3"]);
    });

    it("should provide values for single key", function() {
      expect(getValues(["key1"])).toEqual(["value1"]);
    });
  });

Now we have failing test (and 100% test coverage at the same time ;)) and our implementation should definitely be fixed.

But, if we are really stubborn or have no clue how to implement this required function we can fix it like this.

  function getValues(keys) {
    return (keys.length == 1) ? ["value1"]
        : ["value1", "value2", "value3"];
  }

which is still wrong, although we already have two passing tests and our test coverage is still 100%.

Then we have no choice but to test all the possible combinations of the keys present in the dictionary.

  describe("getValues", function() {

    sets(["key1", "key2", "key3"]).forEach(function(testInput) {
      var testCaseName = "should provide values for '" 
          + testInput.join(",") + "'";

      it(testCaseName, function() {
        var expectedOutput = testInput.map(function(key) {
          return key.replace("key", "value");
        });
        expect(getValues(testInput)).toEqual(expectedOutput);
      });
    });
  });

Here we are using some function sets that generates all the possible sets from the given arguments. Its implementation is left out of scope of this article.

It looks like our test suite is now more complicated then the code we test. It has 8 test cases which all pass and provides 100% test coverage. But now it seems that the only valid implementation to make all those tests pass is the original one.

  function getValues(keys) {
    return keys.map(function(key) {
      return dictionary[key];
    });
  }

OK. So, are we finished yet?

Well, not quite. There are still many scenarios for our code that were not covered but which we may in fact expect to occur when our code is used.

What if we provide some unexpected input or a key that is not present in the dictionary? What should the behavior be? Let’s add a couple more tests.

  describe("getValues", function() {

    sets(["key1", "key2", "key3"]).forEach(function(testInput) {
      var testCaseName = "should provide values for '" 
          + testInput.join(",") + "'";

      it(testCaseName, function() {
        var expectedOutput = testInput.map(function(key) {
          return key.replace("key", "value");
        });
        expect(getValues(testInput)).toEqual(expectedOutput);
      });
    });

    it("should handle invalid input properly", function() {
      expect(getValues(null)).toEqual([]);
    });

    it("should return no value for unknown key", function() {
      expect(getValues(["key1", "unknown", "key3"]))
          .toEqual(["value1", undefined, "value3"]);
    });
  });

Unfortunately our implementation does not pass the test for invalid input and we should correct it a bit. Let’s do it.

  function getValues(keys) {
    return keys ? keys.map(function(key) {
      return dictionary[key];
    }) : [];
  }

OK, now we have 10 test cases and still 100% test coverage which, by the way, it seems, we had all along in this example. Should we stop at this point?

If we look formally, there are still lots of untested scenarios, for example, what if dictionary contains other keys or no keys at all, will our code work? So we can get really paranoid about our code, do not believe that it works and add more and more tests. But, rather than wasting time and doing that, let’s just say that now it just works because we tested basic scenarios well and even some invalid inputs.

Yes, that’s right, as much as our tests give us confidence, without strict mathematical proof of correctness at some point we should just say “we believe that it works now”. This is just how it is, tests are a tool not a means. When our tool gives us enough confidence and lets us explore the code enough in the end it is still our judgement whether the code works or not. By the way, this is precisely why our code still needs to be tested or looked at by other people afterwards. As good as we hope it is, our judgement may be flawed and we can miss some important scenarios in which our code will be used.

Given this simple example, let’s move on directly to the final part of this article and formulate some of the conclusions that now should be more or less evident.

Summary

  • Test coverage is just one of many metrics that can be used to judge how good our tests are
  • Name “test coverage” is misleading, it should be more like “line coverage”
  • Line coverage is a simplistic metric that measures not the percentage of possible scenarios that were covered, but rather that of executed lines of code
  • Line coverage is being measured primarily because it is easy to measure
  • Reaching 100% line coverage does not guarantee that code works
  • For strictly proving that code is correct a whole different approach is needed
  • Don’t be deceived by nice line coverage metric values
  • Spending a lot of effort on reaching 100% line coverage may not be worth it, because scenario coverage may still be well below 100%
  • Consider other metrics in combination with line coverage
  • Computing scenario coverage is more difficult than line coverage
  • Tests do not prove that code works, only give more confidence
  • Avoid excessive confidence in tests
  • Quality of the code depends on the quality of tests
  • Automated testing and TDD are great tools that improve the quality of software dramatically
  • It is difficult or not feasible to cover all possible scenarios for code
  • Some leap of faith is still needed that the code works
  • There is no exact recipe when we have written enough tests, not too many not too few
  • Avoid being too speculative about code and adding too many extra tests, added value per test will be less
  • Thoroughly testing invalid inputs is fine for publicly exposed APIs, but may make little sense for internal library code, but, again, no exact recipe

Links

Code from the article
Formal Verification
Test-Driven Development
Jasmine (JavaScript testing framework)

Eloquent JavaScript with Underscore.js

Contents

We need a library for that…
Underscore.js to the rescue
Performance
Language independent concepts
Functional programming
Underscore.js: under the hood
Alternatives
Summary

We need a library for that…

Before looking at Underscore.js more closely let’s first discuss the context in which it can be useful. We will see what problems we may have and that it actually solves them well. Because, who knows maybe we don’t need Underscore.js at all and you can already stop reading the article?

Here is our problem. Let’s say that as part of some other larger project we would like to write code that analyzes text and outputs some important information like the list of all the used words in the alphabetical order, the top 10 most frequently used words, the total number of words, etc.

This is what our first attempt at solving the problem might look like if we never heard of functional programming in general and Underscore.js and corresponding JavaScript APIs in particular.

The text we would like to analyze:

var text = "Alice was beginning to get very tired of sitting \
by her sister on the bank, and of having nothing to do: once \
or twice she had peeped into the book her sister was reading, \
but it had no pictures or conversations in it, \
'and what is the use of a book,' thought Alice \
'without pictures or conversations?'\
\
So she was considering in her own mind (as well as she could, \
for the hot day made her feel very sleepy and stupid), whether \
the pleasure of making a daisy-chain would be worth the trouble \
of getting up and picking the daisies, when suddenly a White \
Rabbit with pink eyes ran close by her.";

And the code that analyzes the text:

function textWords(text) {
    var words = text.match(/[a-zA-Z\-]+/g);

    for (var i = 0; i < words.length; i++) {
        words[i] = words[i].toLowerCase();
    }
    return words;
}

function wordsFrequencies(words) {
    var frequencies = {},
        currentWord = null;
    
    for(var i = 0; i < words.length; i++) {
        currentWord = words[i];
        frequencies[currentWord] =
            (frequencies[currentWord] || 0) + 1;
    }
    return frequencies;
}

function sortedListOfWords(wordsFrequencies) {
    var words = [];

    for (var key in wordsFrequencies) {
        if (wordsFrequencies.hasOwnProperty(key)) {
            words.push(key);
        }
    }
    return words.sort();
}

function topTenWords(wordsFrequencies) {
    var frequencies = [],
        result = [];

    for (var key in wordsFrequencies) {
        if (wordsFrequencies.hasOwnProperty(key)) {
            frequencies.push([key, wordsFrequencies[key]]);
        }
    }

    frequencies = frequencies.sort(function(freq1, freq2) {
        return (freq1[1] < freq2[1])
            ? 1
            : (freq1[1] > freq2[1] ? -1 : 0);
    });

    for (var i = 0; i < 10; i++) {
        result[i] = frequencies[i];
    }
    return result;
}

function analyzeText(text) {
    var words = textWords(text),
        frequencies = wordsFrequencies(words),
        used = sortedListOfWords(frequencies),
        topTen = topTenWords(frequencies);

    console.log("Word count = ", words.length);
    console.log("List of used words = ", used);
    console.log("Top 10 most used words = ", topTen);
}

analyzeText(text);

This should be self explanatory, but still let’s look at one of the methods more closely, in particular we will be interested in low level implementation details:

function wordsFrequencies(words) {
    var frequencies = {},
        currentWord = null;
    
    for(var i = 0; i < words.length; i++) {
        currentWord = words[i];
        frequencies[currentWord] =
            (frequencies[currentWord] || 0) + 1;
    }
    return frequencies;
}

Here we just iterate through the list of all words and for each word increment its frequency value stored in frequencies. Note, that this implementation contains the details how we exactly increment the index when getting the next word and this is pretty low level. It is first not important to our implementation and second very likely can be reused in many other use cases. This is precisely the reason why JavaScript has it already abstracted into a separate function Array.prototype.forEach. Let’s rewrite wordsFrequencies using this function instead:

function wordsFrequencies(words) {
    var frequencies = {};
    
    words.forEach(function(word) {
        frequencies[word] = (frequencies[word] || 0) + 1;
    });
    return frequencies;
}

No doubt the implementation became somewhat clearer without an extra index variable i and currentWord. But actually even this version can be made shorter and the low level implementation details of how exactly frequencies changes with each processed word can also be partially hidden. For that we will use the Array.prototype.reduce function:

function wordsFrequencies(words) {
    return words.reduce(function(frequencies, word) {
        frequencies[word] = (frequencies[word] || 0) + 1;
        return frequencies;
    }, {});
}

It seems like we improved this part quite a bit. But now we notice that in another place of our code we read the list of all the keys of an object, and there is also a separate Object.keys function provided by JavaScript to do that, and instead of:

    for (var key in wordsFrequencies) {
        if (wordsFrequencies.hasOwnProperty(key)) {
            frequencies.push([key, wordsFrequencies[key]]);
        }
    }

we can write:

    frequencies = Object.keys(wordsFrequencies).map(function(key) {
        return [key, wordsFrequencies[key]];
    });

Much more readable. And here we also used the Array.prototype.map function.

Now below is the whole version of our program rewritten using the JavaScript standard methods we mentioned above:

function textWords(text) {
    return text.match(/[a-zA-Z\-]+/g).map(function(word) {
        return word.toLowerCase();
    });
}

function wordsFrequencies(words) {
    return words.reduce(function(frequencies, word) {
        frequencies[word] = (frequencies[word] || 0) + 1;
        return frequencies;
    }, {});
}

function sortedListOfWords(wordsFrequencies) {
    return Object.keys(wordsFrequencies).sort();
}

function topTenWords(wordsFrequencies) {
    var frequencies = [],
        result = [];

    frequencies = Object.keys(wordsFrequencies)
        .map(function(key) {
            return [key, wordsFrequencies[key]];
        }).sort(function(freq1, freq2) {
            return (freq1[1] < freq2[1])
                ? 1
                : (freq1[1] > freq2[1] ? -1 : 0);
        });

    for (var i = 0; i < 10; i++) {
        result[i] = frequencies[i];
    }
    return result;
}

function analyzeText(text) {
    var words = textWords(text),
        frequencies = wordsFrequencies(words),
        used = sortedListOfWords(frequencies),
        topTen = topTenWords(frequencies);

    console.log("Word count = ", words.length);
    console.log("List of used words = ", used);
    console.log("Top 10 most used words = ", topTen);
}

analyzeText(text);

The program became shorter and much more clear. However, if we look carefully, we can notice that there are still a few places with lots of low-level details, for example:

function topTenWords(wordsFrequencies) {
    var frequencies = [],
        result = [];

    frequencies = Object.keys(wordsFrequencies)
        .map(function(key) {
            return [key, wordsFrequencies[key]];
        }).sort(function(freq1, freq2) {
            return (freq1[1] < freq2[1])
                ? 1
                : (freq1[1] > freq2[1] ? -1 : 0);
        });

    for (var i = 0; i < 10; i++) {
        result[i] = frequencies[i];
    }
    return result;
}

still has low level details related to sorting and getting the first 10 elements.

Moreover this function clearly does too much at once and almost asks to split it in two functions. And having 10 hardcoded in the body of the function is clearly far from perfect. Notice that this became much more evident only after we partially re-factored the code of the original function and abstracted away some of the implementation details. For now we will stop here with our re-factoring and return to this function later when we will use Underscore.js in the process.

Unfortunately the standard JavaScrit, while providing a number of useful functions such as map, reduce, filter, etc. still lacks some other functions and the API is a bit limited.

For example in the case of topTenWords function above we miss the function for taking first n elements from an array which is quite common to many languages, see take from the standard Clojure library or take from the standard Ruby library.

This is where Underscore.js comes to the rescue.

Underscore.js to the rescue

Underscore.js can be installed as a Node module:

npm install underscore

Or you can just include the minified source on your page:

<script
src="http://documentcloud.github.com/underscore/underscore-min.js">
</script>

The source code for the library can be found on Github github.com/jashkenas/underscore

Underscore.js does just what we need: it provides a large number of convenient functions that we can use to get rid of low level implementation details in our programs. There is some intersection with the standard JavaScript API, but Underscore.js provides far more useful functions than we can find in the standard JavaScript. For example, the last function we considered for getting the top 10 frequent words can be rewritten as follows:

function wordsAndFrequenciesDescending(wordsFrequencies) {
    return _.sortBy(_.map(_.keys(wordsFrequencies),
        function(key) {
            return [key, wordsFrequencies[key]];
        }),
        _.property("1")).reverse();
}

function topWords(wordsFrequencies, number) {
    return _.take(
        wordsAndFrequenciesDescending(wordsFrequencies),
        number
    );
}

Notice that it is now more terse and expressive. _.keys corresponds to Object.keys, _.map to Array.prototype.map we encountered before, etc. Also we see that Underscore.js does include the take method we mentioned before and which was missing from the standard JavaScript API. The function by which we sort became much shorter and clearer as well thanks to using the _.property function provided by Underscore.js.

Another thing that we immediately notice about Underscore.js is that rather than adding methods to JavaScript objects, Underscore.js provides external methods that take an object as a parameter.

Underscore.js also allows to use a more object-oriented style by wrapping an object and making its functions available on the resulting wrapper object as methods. When invoked each such method returns another wrapper object that contains the intermediate computation result and on which we can again invoke Underscore.js methods. This way we can chain computations.

For example, compare:

var object = {
    "key1": "value1",
    "key2": "value2",
    "key3": "value3"
};

_(object).keys();
_.keys(object);

Both ways of calling keys in this case are valid. You can read more about wrapping objects with Underscore.js and chaining in the documentation.

And here is the full version of our initial program rewritten using Underscore.js functions.

function textWords(text) {
    return _.map(text.match(/[a-zA-Z\-]+/g), function(word) {
        return word.toLowerCase();
    });
}

function wordsFrequencies(words) {
    return _.reduce(words, function(frequencies, word) {
        frequencies[word] = (frequencies[word] || 0) + 1;
        return frequencies;
    }, {});
}

function sortedListOfWords(wordsFrequencies) {
    return _.sortBy(_.keys(wordsFrequencies));
}

function wordsAndFrequenciesDescending(wordsFrequencies) {
    return _.sortBy(_.map(_.keys(wordsFrequencies),
        function(key) {
            return [key, wordsFrequencies[key]];
        }),
        _.property("1")).reverse();
}

function topWords(wordsFrequencies, number) {
    return _.take(
        wordsAndFrequenciesDescending(wordsFrequencies),
        number
    );
}

function analyzeText(text) {
    var words = textWords(text),
        frequencies = wordsFrequencies(words),
        used = sortedListOfWords(frequencies),
        topTen = topWords(frequencies, 10);

    console.log("Word count = ", words.length);
    console.log("List of used words = ", used);
    console.log("Top 10 most used words = ", topTen);
}

analyzeText(text);

The functions became much more succinct and clear and the low level implementation details are now well hidden.

Actually, it is possible to make (thanks for pointing this out, rooktakesqueen) the code even more expressive. Using the _.chain function we can re-write wordsAndFrequenciesDescending as follows:

function wordsAndFrequenciesDescending(wordsFrequencies) {
    return _.chain(wordsFrequences)
        .keys()
        .map(function(key) {
            return [key, wordsFrequencies[key]];
        })
        .sortBy(_.property('1'))
        .reverse()
        .value();
}

And… That’s it, if you have managed to follow the article this far, you already have a good grasp of what Underscore.js is and how it can help you with writing your code. You can always get more information about Underscore.js by reading its annotated source code or documentation. The number of provided functions is considerably larger than what we discussed so far, in particular there are separate functions for objects, arrays, collections and functions, as well as a few generic utility functions.

Even more functions can be found in underscore-contrib. Although the functions there may be less generic and suitable only for a particular type of problems. If you cannot find some function in Underscore.js, check it out, it may already contain what you need. But this part is out of the scope of the present article.

What follows below is more detailed discussion about the style of programming promoted by Underscore.js, performance, implementation details of the library, etc. Read it if you would like to have more advanced understanding of the library.

Performance

Underscore.js provides us high level abstract functions that make our code clearer and shorter, that is it makes us as developers more productive, but what about the computer productivity? Is our code performant enough? Let’s use jsperf to test that in our case and see some results for the three implementations above:

underscore_vs_map_reduce_keys_vs_loops

Here is the link to the test cases and the full results http://jsperf.com/underscore-js-vs-map-reduce-keys-vs-low-level

We immediately see that using the native map, reduce and keys is from 1.5 to 2 times faster than the Underscore.js version.

Suprisingly enough in the case of our program for Chrome and IE10 using native map, reduce and keys is even faster than the low level implementation. But actually it does make sense, because those native methods are implemented as native code which is somewhat faster than trying to write the same logic in JavaScript.

Although this does not always seem to be true, and the low level implementation can still be much faster than the native forEach and reduce if the arrays are large enough and contain only numbers as another benchmark demonstrates http://jsperf.com/foreach-vs-reduce-vs-for-loop

The main result here is that the performance of all the three approaches is of the same order, i.e. is comparable. Then if we get more readability with Underscore.js or native functions we probably should use them as we do not loose much in performance and in the case of Chrome we actually win.

Based on this benchmark the recommendation will be consider avoiding writing your own loops, as they are much less expressive, more complicated and do not always guarantee better performance.

If you still have doubts, in general, when performance considerations enter your decision making, please, remember, as a rule we should optimize only the 10% of the code that takes 90% of the execution time, otherwise we are wasting our development time, do not win much performance-wise and make our code unnecessary complicated.

Language independent concepts

If you are familiar with any other languages than JavaScript you might have seen already something similar to the functions we used above. Ruby has its Enumerable module which defines many of the similar methods, Java has Guava and in fact almost everybody in the Java world tries to develop their own version of Underscore.js without even sometimes realizing it, Scala has many of these methods included into the standard library, etc.

If you look carefully at what we discussed so far, you will see that there is not much that is JavaScript specific. We just talked about collections, functions, passing functions into other functions and creating higher level functions, that is functions that can accept other functions as arguments. In fact, we can define functions like map, filter, reduce, etc. in any other language that has the concepts mentioned above.

A large part of the philosophy and ideas behind Underscore.js is thus language independent and quite generic. But of course, in order to be practically useful it also has a sizable JavaScript-specific part which is still needed by JavaScript developers, for example, take a look at the _.toArray and _.isDate functions.

That ideas and philosophy are in large part inspired by Functional Programming (FP), which is a development paradigm that views functions as the primary building block of programs.

For some languages that currently do not treat functions as important enough, for example, Java, it is stil possible to emulate passing functions into functions and create something similar to Underscore.js but it will look much uglier and will be quite cumbersome to use, for example, compare the different versions of a program that converts a collection of strings into a collection of lengths of each string:

the Java version (using the Functional Java library):

Array.<String, Integer>map().f(new F<String, Integer>() {

    @Override
    public Integer f(String arg) {
        return arg.length();
    }
}).f(array("a", "ab", "abc")).array(Integer[].class));

the Scala version:

Array("a", "ab", "abc").map(_.length())

the Ruby version:

["a", "ab", "abc"].map {|str| str.length}

and the JavaScript one:

["a", "ab", "abc"].map(function(str) {
    return str.length;
});

Now it is clearly time for a bit of critism in the direction of JavaScript. You can see that while JavaScript version is comparable to the Scala one it is still a bit more wordy and includes syntactic noise such as function and return keywords. But here Underscore.js will not help us much, as we cannot easily circumvent the core language limitations. And we can only feel sorry for poor Java developers until they finally get lambdas in Java 8.

Functional programming

This is a generic programming paradigm in which the primary (or at least one of the primary) building blocks that are used to create new programs are functions.

Another things often talked about in relation to Functional Programming (FP) are immutability and referential transparency.
We will not go into many details what those mean, and provide only a brief explanation, but please, feel free to take a deep dive and explore more on your own.

In a couple of words the basic principles of FP can be summed up as follows:

  • You can substitute a function invocation with the body of the function withouth changing the results of the computation (referential transparency)
  • There is no shared state in the program, functions accept as arguments and produce immutable objects
  • There is no notion of time, the actual scheduling of when various parts of the program will be evaluated does not affect the results of the computation as long as each function gets all of its arguments before its invocation
  • Functions can be passed as arguments into other functions and can be returned from functions (in other words, functions are “first-class citizens”)

The programs in FP are more like mathematical statements or formulas then a set of imperative instructions that should be executed one by one.

Many of the languages considered “functional” do not follow all of the outlined principles to begin with. For example, even in Scala it is possible to have mutable shared state although there is considerable language support for immutability. Quite often the theoretical beauty of FP has to make some room for practical concerns: writing something to disk or sending a network message obviously do require to have the notion of time in programs.

It is relatively clear that JavaScript only satisfies the last requirement. We can of course try to create programs that have no shared state and will be referentially transparent in JavaScript but it will require additional efforts from our side as the developers and we are not restricted to violate those principles by the language itself.

That said, having functions as “first-class citizens” in JavaScript is actually quite a powerful feature already. It moves us considerably in the direction of FP, and we can always try to follow the rest of the principles of FP when it suits us best. Definitely Underscore.js provides a great deal of help here.

Underscore.js: under the hood

Let’s now take a look at the implementation details of Underscore.js. There we can find some good examples of functional style of programming but normally the library tries to avoid using its own functions when implementing other functions because of the performance concerns, so some of the examples we will see will be what we call here “low-level”. And this is perfectly acceptable because many libraries depend on Underscore.js and here the performance actually does play an important role, it is even probably more important than readability.

The full source code of Underscore.js is available in the github repository https://github.com/jashkenas/underscore

One example of the functional approach used in Underscore.js is the union function:

  _.union = function() {
    return _.uniq(_.flatten(arguments, true));
  };

The implementation clearly explains what the function does: given a few arrays it first concatenates those arrays with _.flatten and then removes non-unique elements with _.uniq.

Another good example of the functional style is a number of functions that deal with grouping, let’s look at the code for _.groupBy:

  // An internal function used for aggregate "group by" operations.
  var group = function(behavior) {
    return function(obj, iterator, context) {
      var result = {};
      iterator = lookupIterator(iterator);
      each(obj, function(value, index) {
        var key = iterator.call(context, value, index, obj);
        behavior(result, key, value);
      });
      return result;
    };
  };

  // Groups the object's values by a criterion. Pass either 
  //a string attribute to group by, or a function that 
  //returns the criterion.
  _.groupBy = group(function(result, key, value) {
    _.has(result, key)
        ? result[key].push(value) 
        : result[key] = [value];
  });

group is quite an interesting function. It accepts another function that alters its behavior and then returns a function that accepts an object and an iterator. The third argument context is optional, it can specify on which object the iterator should be invoked, i.e. the value of this inside the iterator function. This function returned from group when it is invoked calls the provided iterator to get the key for each value it gets from the target object on which it was invoked. If object is an array, then value will be an element of that array. Once we have key and value we use the provided behavior to process them and maybe alter the result which we first initialize to an empty object. In the end we return result.

We call functions that accept other functions as arguments “higher-order” functions. Then, speaking in the language of Functional Programming, group is just a higher-order function that returns another higher-order function once it is invoked.

This may sound too complicated, but once we look at a concrete example of how _.groupBy is defined and used, everything becomes much clearer.

We see that _.groupBy is just a function returned by the group function which we customize with a specific behavior that for each key and value pushes that value into the array of values stored in result[key]. This way we get all the values stored in the result grouped into corresponding arrays which can be accessed as properties on the result object.

An example of how the _.groupBy function is used:

  //Result: {"even":[0,2,4],"odd":[1,3]}
  _.groupBy([0, 1, 2, 3, 4], function(value) {
    return (value % 2 == 0) ? "even" : "odd";
  });

Here we provide the concrete iterator function that specifies how to map each value to a key. In this case this is a function that determines for each value whether it is odd or even.

The rest of the grouping functions _.indexBy and _.countBy are defined in a very similar fashion:

  // Indexes the object's values by a criterion, similar
  // to `groupBy`, but for when you know that your index
  // values will be unique.
  _.indexBy = group(function(result, key, value) {
    result[key] = value;
  });

  // Counts instances of an object that group by
  // a certain criterion. Passeither a string attribute
  //to count by, or a function that returns the criterion.
  _.countBy = group(function(result, key) {
    _.has(result, key) ? result[key]++ : result[key] = 1;
  });

You can actually see what they do by doing an analysis of code similar to what we have just done with _.groupBy.

But as we mentioned not everything in Underscore.js is written in a functional style. An example of this is the _.object function that allows to create an object from provided arrays of properties in two ways:

  //Result: {"key1": "value1",
  //  "key2": "value2", "key3": "value3"}
  _.object([
    ["key1", "value1"],
    ["key2", "value2"],
    ["key3", "value3"]
  ]);

  //Result: {"key1": "value1",
  //  "key2": "value2", "key3": "value3"}
  _.object(["key1", "key2", "key3"],
    ["value1", "value2", "value3"]);

The current implementation is as follows:

  _.object = function(list, values) {
    if (list == null) return {};
    var result = {};
    for (var i = 0, length = list.length; i < length; i++) {
      if (values) {
        result[list[i]] = values[i];
      } else {
        result[list[i][0]] = list[i][1];
      }
    }
    return result;
  };

Which is quite low level and complicated. If we were to rewrite this using the functional style, we would get a shorter and cleaner version:

  _.object = function(list, values) {
    if (list == null) return {};
    var pairs = values 
      ? _.zip(list, _.take(values, list.length)) 
      : list;
    return _.reduce(pairs, function(result, pair) {
      result[pair[0]] = pair[1];
      return result;
    }, {});
  };

But this version turns out to be almost 10 times slower because of using of the _.zip and _.take functions which are themselves a bit slow. In the end we sacrifice the readability and functional purity for the performance and choose to leave the current implementation in place. The corresponding performance test that demonstrates the comparative performance of the two implementations
can be found here http://jsperf.com/underscore-object-implementations

Here we will stop with exploring the internal workings of Underscore.js as the parts of the library that we reviewed are already quite representative, but feel free to review the rest of the code.

Alternatives

There are a number of alternative helper libraries or APIs that you can use, but Underscore.js is by far the most popular one and the one where you can count on good support and the availability of the need features. De-facto this library has become a standard, for example, it is the most dependent upon Node module.

But as we have seen among the drawbacks may be a bit of a loss of the functional purity in the implementation, large API and slightly worse than native performance. Also not everybody can like the default Underscore.js style when we have to execute external functions on each object. And surely there are always alternatives.

One of them is the Lo-Dash library (thanks jcready for the reference). Personally I did not use it much, but it looks quite interesting and seems to do all of the things that Underscore.js does and sometimes even a bit more. A quick benchmark http://jsperf.com/reduce-underscore-js-vs-lo-dash shows that _.reduce is 2 times faster in Lo-Dash than in Underscore.js when the benchmark is run in Chrome, but at the same time in Firefox the two libraries do not have noticable performance differences.

Yet another alternative you may consider is Lazy.js (thanks brtt3000), it seems to be the fastest library available based on the benchmarks provided on its site comparing it both with Underscore.js and Lo-dash. If your main concern is performance you may give this library a try.

Also you can always just use the native methods analogous to those provided by Underscore.js: map, reduce, filter, etc. Modern browsers support them well and Underscore.js itself falls back to the native implementations for its functions when it is possible for performance reasons. But be mindful that the performance win will not be more than 50% – 100% which can be relatively insignificant if the hot spots of your application lie elsewhere.

If you want to have a small core of well-defined functions and more of a functional paradigm, then consider using, for example, fn.js https://github.com/eliperelman/fn.js, a “JavaScript library built to encourage a functional programming style & strategy.”

Summary

We have seen that:

  • Writing our own loops and low level code makes our programs less readable and not always faster
  • Instead the native higher-order functions should be used or a specialized library like Underscore.js
  • With Underscore.js the resulting code is much more maintainable, as a result the development productivity grows
  • The performance cost of using Underscore.js is acceptable in most cases
  • It would be good to include functions similar to some of the Underscore.js functions into the language standard and support them natively

If you find yourself writing many loops and iterating over arrays a lot in your project you should definitely give Underscore.js a try and see how your code improves.

The code examples from this article can be found on github github.com/antivanov/misc/tree/master/JavaScript/Underscore.js

Links

Underscore.js
Lo-Dash
Lazy.js
“Functional JavaScript: Introducing Functional Programming with Underscore.js” book

Aspect Oriented Programming in JavaScript

Contents

Aspect Oriented Programming
JavaScript Library for Aspect Oriented Programming
“before” advice
“after” advice
“afterThrowing” advice
“afterReturning” advice
“around” advice
Introducing methods
Library Implementation Details
Conclusion

Aspect Oriented Programming

You are probably already familiar with Object Oriented Programming (OOP) and Functional Programming (FP) paradigms, Aspect Oriented Programming (AOP) is just another programming paradigm. Let’s quickly recall what OOP and FP mean and then define what AOP is.

In OOP programs are constructed from objects: encapsulated data is guarded against access by other code and has a few methods attached to it that allow reading and modifying this data.

In FP the primary building block is function. Functions can be passed as arguments to other functions or returned from functions, ideally there is no shared state and each function communicates with other functions just by means of its return values (output) and parameters (inputs).

AOP in its turn is centered around aspects. Aspect is a module of code that can be specified (adviced) as executable at a certain place in the rest of the code (pointcut). A good introduction into AOP for Java is given in the Spring framework documentation. Here are the definitions of the key terms in AOP:

  • Aspect – module of code to be executed
  • Advice – specification when an aspect should be executed
  • Pointcut – place in code where an advice should be applied

What all those words mean in practice will be more clear from the examples below.

These paradigms are not mutually exclusive, for example, in JavaScript it is possible to use both the Object Oriented and Functional ways of doing things, and usually it is a mix of both. Some languages definitely support one paradigm better than another or do not support some paradigms at all: as an example, Java is primarily an OOP language and Haskell is a FP language.

Ultimately these are just different approaches at how one can structure their programs and they have their strong and weak points in certain situations. OOP is fine when we have a complex domain area with many entities and relations between them and we would like to reflect all those things in the code base so that we can support and evolve our application easier. FP works well when we need to do many computations and can make a good use of its ability to decompose a complex algorithm into simpler reusable parts that are easy to comprehend. AOP is well-suited for cases when we want to introduce some new additional universal behavior, such as logging, transaction or error handling. In that case we would like this additional functionality orthogonal to the core logic of our application to be put into one place and not be scattered across the whole application.

JavaScript Library for Aspect Oriented Programming

As discussed above JavaScript supports both OOP and FP. It also turns out that it is very easy to add support for AOP to JavaScript by writing a simple library. I was inspired by the article by Danne Lundqvist’s Aspect Oriented Programming and javascript and just decided to implement my own library which will support a few more advices and will provide a different API.

JavaScript allows to easily redefine methods, add properties to objects during execution time, and also functions are objects in JavaScript. As a result a full-fledged Aspect Oriented Framework in JavaScript is only about 150 lines long as you will shortly see. The topic may be a bit advanced for a beginner JavaScript programmer, so it is assumed that the reader at this point has a good handle of prototypes, closures, invocation context, and other advanced features that make programming in JavaScript so much fun. If this sounds like something completely new, please, refer to the Eloquent JavaScript book by Marijn Haverbeke.

Our library will support the following:

  • Aspect – just functions, as almost everything in JavaScript is a function
  • Advice – “before” before method, “after” after method, “afterThrowing” when an exception is thrown, “afterReturning” just before returning a value from a function, “around” at the moment of function execution
  • Pointcut – “methods” all the methods of an object, “prototypeMethods” all the methods defined on the prototype of an object, “method” only a single method of an object

Let’s take a closer look and start from examples.

“before” advice

Simple example of using the AOP library:

    test("jsAspect.inject: 'before' advice, 'prototypeMethods' pointcut", function() {
        function Object() {
        };
        
        Object.prototype.method1 = function() {
            return "method1value";
        };
        
        Object.prototype.method2 = function() {
            return "method2value";
        };
        
        jsAspect.inject(Object, jsAspect.pointcuts.prototypeMethods, jsAspect.advices.before,
            function beforeCallback() {
                var args = [].slice.call(arguments, 0);

                this.beforeCallbackArgs = this.beforeCallbackArgs || [];
                this.beforeCallbackArgs.push(args);
            }
        );

        var obj = new Object();
        
        equal(obj.method1("arg1", "arg2"), "method1value", "method1 was called as expected and returned the correct value");
        equal(obj.method2("arg3", "arg4", "arg5"), "method2value", "method2 was called as expected and returned the correct value");
        deepEqual(obj.beforeCallbackArgs, [["arg1", "arg2"], ["arg3", "arg4", "arg5"]], "before callback was called as expected with correct 'this'");
    });

In order to advice application of the aspect beforeCallback before invocation of each method defined on the prototype of Object we call jsAspect.inject with appropriate arguments:

    jsAspect.inject(Object, jsAspect.pointcuts.prototypeMethods, jsAspect.advices.before,
        function beforeCallback() {
            var args = [].slice.call(arguments, 0);

            this.beforeCallbackArgs = this.beforeCallbackArgs || [];
            this.beforeCallbackArgs.push(args);
        }
    );

As a result the function beforeCallback is executed before each method with that method’s arguments each time it is invoked. In the callback function this refers to the object on which the original method was called. In this example we just check if there is an array of arguments defined on that object. If there is no array we create it and then record all the current arguments there. The test above does not actually verify that the execution happens before the method but it is also easy to check, this can be a simple exercise for the reader.

“after” advice

“after” advice is quite similar to “before”, the difference is only in one argument to jsAspect.inject and the fact that the aspect will actually be executed after the original method not before it:

    jsAspect.inject(Object, jsAspect.pointcuts.prototypeMethods, jsAspect.advices.after,
        function afterCallback() {
            var args = [].slice.call(arguments, 0);

            this.afterCallbackArgs = this.afterCallbackArgs || [];
            this.afterCallbackArgs.push(args);
        }
    );

“afterThrowing” advice

This advice is executed when an exception occurs in the original method. Then this exception is first passed to the aspect as an argument and is still rethrown later in the original method. Example:

    test("jsAspect.inject: 'afterThrowing' several aspects", function() {
        function Object() {
        };
        
        Object.prototype.method1 = function() {
            throw new Error("method1exception");
        };
        
        Object.prototype.method2 = function() {
            throw new Error("method2exception");
        };
        
        jsAspect.inject(Object, jsAspect.pointcuts.prototypeMethods, jsAspect.advices.afterThrowing,
            function afterThrowingCallback(exception) {
                exception.message = exception.message + "_aspect1"
            }
        );
        jsAspect.inject(Object, jsAspect.pointcuts.prototypeMethods, jsAspect.advices.afterThrowing,
            function afterThrowingCallback(exception) {
                exception.message = exception.message + "_aspect2"
            }
        );

        var obj = new Object();
        var thrownExceptions = [];
        
        ["method1", "method2"].forEach(function (methodName) {
            try {
                obj[methodName]();
            } catch (exception) {
                thrownExceptions.push(exception.message);
            }
        });
        
        deepEqual(thrownExceptions, ["method1exception_aspect2_aspect1", "method2exception_aspect2_aspect1"], "Multiple aspects are applied");
    });

Also we see here that a few aspects can be applied for the same advice. In fact this is true not only for “afterThrowing” but for types of supported advices. In the aspect we just append a suffix to the exception message and then verify that the exceptions are still rethrown from the original methods with the modified as expected messages.

“afterReturning” advice

This advice is applied when the original function is about to return its value. Then this value is passed as an argument to the aspect and the actual return value will be whatever the aspect decides to return. A few aspects can be applied at the same time as well:

    test("jsAspect.inject: several 'afterReturning' aspects", function() {
        function Object() {
        };
        
        Object.prototype.identity = function(value) {
            return value;
        };
        
        ["aspect1", "aspect2", "aspect3"].forEach(function (aspectName) {
            jsAspect.inject(Object, jsAspect.pointcuts.prototypeMethods, jsAspect.advices.afterReturning,
                function afterReturningCallback(retValue) {
                    return retValue + "_" + aspectName;
                }
            );
        });
        
        equal(new Object().identity("value"), "value_aspect3_aspect2_aspect1", "'afterReturning' several aspects applied in the reverse order");     
    });

In this example we create several named aspects and in each of them append the name of the aspect to the return value.

“around” advice

The most interesting advice is “around”. Here aspect receives several arguments: the original function to which the aspect was applied (can be actually just another aspect, but this is entirely hidden from the current aspect) and the arguments of the original function. Then the return value of the aspect is returned from the original function:

    test("jsAspect.inject: 'around' advice, 'prototypeMethods' pointcut", function() {
        function Object() {
        };
        
        Object.prototype.identity = function(x) {
            return x;
        };
        
        Object.prototype.minusOne = function(x) {
            return x - 1;
        };
        
        jsAspect.inject(Object, jsAspect.pointcuts.prototypeMethods, jsAspect.advices.around,
            function aroundCallback(func, x) {
                return 2 * func(x);
            }
        );

        var obj = new Object();
        
        equal(obj.identity(3), 6, "'around' advice has been applied to 'identity'");
        equal(obj.minusOne(3), 4, "'around' advice has been applied to 'minusOne'");
    });

Introducing methods

We can also easily add methods to existing objects like this:

    test("jsAspect.introduce: 'methods' pointcut", function() {
        function Object() {
            this.field1 = "field1value"; 
            this.field2 = "field2value"; 
        };
        
        Object.prototype.method1 = function () {
            return "valuefrommethod1";
        };

        jsAspect.introduce(Object, jsAspect.pointcuts.methods, {
            field3: "field3value",
            staticmethod1: function () {
                return "valuefromstaticmethod1";
            }
        });

        equal(Object.field3, "field3value", "Object.prototype.field3");
        equal(Object.staticmethod1 ? Object.staticmethod1() : "", "valuefromstaticmethod1", "Object.staticmethod1");
    });

Another pointcut jsAspect.pointcuts.methods is used here so that we introduce methods and fields not to the object’s prototype but to the object directly.

Library Implementation Details

Now it is time for the implementation details. The basic idea is very simple: we will redefine each method that is matched by the provided pointcut. The redefined method will call the original method after executing the advised aspects at appropriate points in time. For the end user there will be no difference with the original method in how the method should be called.

But let’s first start with something a bit simpler, the introduce method that adds new methods and fields to an object:

    jsAspect.introduce = function (target, pointcut, introduction) {
        target = (jsAspect.pointcuts.prototypeMethods == pointcut) ? target.prototype : target;
        for (var property in introduction) {
            if (introduction.hasOwnProperty(property)) {
                target[property] = introduction[property];
            }
        }
    };

First an appropriate target is determined and then we copy each own property in introduction to this target. It is that easy in JavaScript, no proxies, no additional objects, just plainly defining methods on the original object.

The implementation of the main method we have seen in the examples so far jsAspect.inject:

    jsAspect.inject = function (target, pointcut, adviceName, advice, methodName) {                 
         if (jsAspect.pointcuts.method == pointcut) {
             injectAdvice(target, methodName, advice, adviceName);
         } else {
             target = (jsAspect.pointcuts.prototypeMethods == pointcut) ? target.prototype : target;
             for (var method in target) {
                 if (target.hasOwnProperty(method)) {
                     injectAdvice(target, method, advice, adviceName);
                 }
             };
         };
    };

Again, we compute the correct target and then for each method in the target we inject a new advice as specified by the provided adviceName. Next the function injectAdvice:

    function injectAdvice(target, methodName, advice, adviceName) {
        if (isFunction(target[methodName])) {
            if (jsAspect.advices.around == adviceName) {
                 advice = wrapAroundAdvice(advice);
            };
            if (!target[methodName][adviceEnhancedFlagName]) {
                enhanceWithAdvices(target, methodName);                 
                target[methodName][adviceEnhancedFlagName] = true;
            };
            target[methodName][adviceName].unshift(advice);
        }
    };

If the target method in the object for some reason is not actually a function (just a usual value field instead), then we do nothing. Otherwise we check whether the method has already been enhanced to support advices. If it has not yet been enhanced, we do enhance it, otherwise we simply add a new advice to an additional system field created on the original object by our framework. This field contains an array of all the advices that should be applied for a given adviceName. Also we can see that the “around” advice requires some additional handling, here we just wrap it with wrapAroundAdvice before actually adding it onto the system field on the original method. It will become a bit clearer why we do that after we consider the implementations of the functions enhanceWithAdvices and wrapAroundAdvice.

Next, the function enhanceWithAdvices:

    function enhanceWithAdvices(target, methodName) {
        var originalMethod = target[methodName];

        target[methodName] = function() {
            var self = this,
                method = target[methodName],
                args = [].slice.call(arguments, 0),
                returnValue = undefined;

            applyBeforeAdvices(self, method, args);
            try {
                returnValue = applyAroundAdvices(self, method, args);
            } catch (exception) {             
                applyAfterThrowingAdvices(self, method, exception);
                throw exception;
            };
            applyAfterAdvices(self, method, args);
            return applyAfterReturningAdvices(self, method, returnValue);  
        };
        allAdvices.forEach(function (advice) {           
            target[methodName][jsAspect.advices[advice]] = [];
        });
        target[methodName][jsAspect.advices.around].unshift(wrapAroundAdvice(originalMethod));
    };

This function is really the core of the whole framework and implements the main idea behind it. Let’s look into the details of what happens here. First we store the original method in the variable originalMethod and then redefine it. In the redefined method we first apply the “before” advises before the original method, then “around” advises at the time of execution of the original method, then try to catch an exception and if we do catch an exception, then we re-throw it after calling advises registered to handle exceptions with “afterThrowing” advice. Then “after” advises are applied and then “afterReturing” advises. Pretty transparent and easy, just what one would expect to find in the implementation.

Then we create additional system fields on the original method to store the arrays of advises for each of the possible advice names. Also, at the end we push a wrapped original method as the first advice to the array of “around” advises in order not to deal with border conditions in other functions that will follow below.

Now let’s look at the advice application methods:

    function applyBeforeAdvices(context, method, args) {
        var beforeAdvices = method[jsAspect.advices.before];
        
        beforeAdvices.forEach(function (advice) {                                    
            advice.apply(context, args);
        });
    };

    function applyAroundAdvices(context, method, args) {
        var aroundAdvices = method[jsAspect.advices.around]
                .slice(0, method[jsAspect.advices.around].length),
            firstAroundAdvice = aroundAdvices.shift(),
            argsForAroundAdvicesChain = args.slice();
        
        argsForAroundAdvicesChain.unshift(aroundAdvices);
        return firstAroundAdvice.apply(context, argsForAroundAdvicesChain);
    };

    function applyAfterThrowingAdvices(context, method, exception) {
        var afterThrowingAdvices = method[jsAspect.advices.afterThrowing];
        
        afterThrowingAdvices.forEach(function (advice) {        
            advice.call(context, exception);
        });
    };

    function applyAfterAdvices(context, method, args) {
        var afterAdvices = method[jsAspect.advices.after];
        
        afterAdvices.forEach(function (advice) {                                    
            advice.apply(context, args);
        });
    };

    function applyAfterReturningAdvices(context, method, returnValue) {
        var afterReturningAdvices = method[jsAspect.advices.afterReturning];
        
        return afterReturningAdvices.reduce(function (acc, current) {
            return current(acc);
        }, returnValue);
    };

The implementation is again pretty straightforward. We use forEach to iterate over the “before”, “after” and “afterThrowing advices”, and reduce to apply the “afterReturing” advices in a sequence.

“around” advices are handled a bit differently: we take the first advice (which as you remember was “wrapped” earlier) and pass to it the arguments of the original method together with an array of all the “around” advices as the first argument. For what happens next when executing the first “wrapped” advice we have to look at the implementation of the wrapAroundAdvice method:

    function wrapAroundAdvice(advice) {
        var oldAdvice = advice,
            wrappedAdvice = function (leftAroundAdvices) {
                var oThis = this,
                    nextWrappedAdvice = leftAroundAdvices.shift(),
                    args = [].slice.call(arguments, 1);

                if (nextWrappedAdvice) {
                    var nextUnwrappedAdvice = function() {
                        var argsForWrapped = [].slice.call(arguments, 0);
                
                        argsForWrapped.unshift(leftAroundAdvices);
                        return nextWrappedAdvice.apply(oThis, argsForWrapped);
                    };
                    args.unshift(nextUnwrappedAdvice);
                };
                return oldAdvice.apply(this, args);
            };

        //Can be useful for debugging
        wrappedAdvice.__originalAdvice = oldAdvice;
        return wrappedAdvice;
    };

When invoking a “wrapped” advice we check if there are any next “around” advises left (the last one is the original method if you remember). If there are no advises we deal with the original method which we just invoke by passing to it the arguments provided by user at the point of the invocation of the method enhanced with aspects. Otherwise we “unwrap” the next available “around” advice. The essence of “unwrapping” is that we remove the extra argument containing the array of all the remaining “around” advises. Then we pass this “unwrapped” advice to the current advice as the first argument
so that each “around” advice (except for the original method) has one argument more than the original method: on the first place goes the next advice to be applied or the original method. Then execution of the current advice can trigger
execution of the next available “around” advice (first argument) and we will again recursively go to the function wrapAroundAdvice.

Arguably wrapAroundAdvice is the most complicated piece of the framework. It looks like there are alternatives to emulating stack of calls in this way, for example, we can redefine the function each time a new “around” advice is added. But then we would have to copy all the advises bound to the original method to the new method and this new redefined method will have to have a structure like the method we create in enhanceWithAdvices, and then things get again a bit complicated when we want to add another “around” advice as we would not like to execute each “before” advice more than once, we will have to clean-up the originally added advises, etc. So the present implementation seemed like a reasonably simple although it does require some mental effort to understand.

Conclusion

We demonstrated that it is quite easy to implement a full-fledged AOP framework in JavaScript due to the dynamic nature of the language and standard extensibility possibilities it provides. The created framework implements some of the functionality (advises) of the Java based Spring framework.

Now before you go and use AOP techniques in your code like the ones we used here I feel that a few words of caution should be added. AOP is a quite powerful tool and can decouple code modules well from each other, but the problem is that quite often this decoupling is excessive and introduces additional complexity. As a result it may become virtually impossible to trace what causes what to execute in your code and it can bring a lot of headache when later supporting this code. It really pays off to always try to solve a particular problem using the traditional programming paradigms like OOP and FP and only to resort to AOP when it is really needed. For example, it is much better to introduce logging in one place of your application with one aspect than to add repetitive logging calls all over the place, AOP is of a great use here. That is, knowing some paradigm does not mean that it is always well-suited for solving your problem. This is almost the same as with design patterns, remember the main goal is to write an application fast and easy so that it is maintainable rather than making your code look “smart”. Abusing both design patterns and AOP is certainly discouraged. Following this advice (no pun intended) will save a lot of time for people who will be supporting your code in the future.

And finally, the full implementation of the library can be found here: jsAspect: Aspect Oriented Framework for JavaScript

Links

Article “Aspect Oriented Programming and JavaScript”
Aspect Oriented Programming with Spring (Java)

JavaScript and Friends: CoffeeScript, Dart and TypeScript

Contents

Why JavaScript Isn’t Enough?
Example JavaScript Program: Dijkstra’s Algorithm
CoffeeScript
TypeScript
Dart
Web Application Development
ECMAScript 6
Conclusions

Why JavaScript Isn’t Enough?

This article assumes that the reader has a good knowledge of JavaScript and has done at least some development in it, but if this is not about you, you can just first refer to one of the beginner’s JavaScript books like Eloquent JavaScript.

JavaScript is an amazing, often underappreciated and misunderstood language. It has some really powerful concepts like functions as first-class citizens (see, for example, JavaScript: The World’s Most Misunderstood Programming Language), flexible prototypal inheritance and is a powerful generic programming language that can be used not only in browsers.

Despite all its power and flexibility the language has some well-known design shortcomings such as global variables, cumbersome emulation of lexical scoping, non-intuitive implicit conversions, etc. In fact, there are parts of the language that you better avoid using at all, as it is advised in JavaScript: The Good Parts. Let us also note that from the beginning JavaScript was not specifically designed for developing applications with large code bases and many developers involved.

Nonetheless, it is increasingly used for developing precisely such applications. In such cases in order for the code to be maintainable it should have a well-defined structure and developers should adhere to a strict coding discipline in order to avoid producing a festering pile of messy code where everything depends on everything and no boundaries can be found between modules. Unfortunately, in JavaScript it is all too easy to transform your code base into an abomination, this is somewhat similar to Ruby, but actually even worse, since unlike in Ruby there is no standard mechanism for emulating class-based inheritance and separating your code into modules and packages. Having no types specified in the source code does not help either.

The point is that for large applications JavaScript developers need to be extra careful and disciplined as they are not particularly restricted from producing a horrible pile of code. The most recent trend is exactly towards complex applications being written in JavaScript. For example, for the client side it was well understood for quite some time that moving a lot of presentational logic to the browser makes much more sense than keeping it away from the client on the server. The clients have become thicker and more complex, MVC frameworks for the client side appeared, one of them Backbone.js, etc. Of course, JavaScript is not limited to just the client side and there appeared large server-side applications as well, see Node.js It looks like now there is time for the language to be updated to be better fit for the new challenges and cases that were likely just not foreseen by its creators from the very beginning.

There are quite a few changes coming to JavaScript in the recent versions of the language standard, for example, see ECMAScript 6, but also simultaneously a number of languages started to appear near JavaScript that try to address the described issues. The present article is just a brief overview of the most well-known of these language and a discussion how they relate to each other and JavaScript. This is not a thorough research of all of the mentioned languages, but rather an attempt to get a feeling of what those languages are and why we should care about them.

Example JavaScript Program: Dijkstra’s Algorithm

For our discussion and comparison to be more tangible and less abstract let’s consider some program in JavaScript and see to what it translates in the selected languages while highlighting the most interesting parts and differences between those languages.

As an example, let’s take an implementation of Dijkstra’s algorithm for finding the shortest path between two nodes in a directed graph. For the purposes of the present article it is actually not important to understand how the algorithm works, but in case you are interested in the algorithm itself, you can just read the Wiki article.

So, here is the implementation in JavaScript:

Array.prototype.remove = Array.prototype.remove || function(element) {
	var index = this.indexOf(element);

	if (index >= 0) {
	    this.splice(index, 1);
	};
};

Array.prototype.contains = Array.prototype.contains || function(element) {
	return this.indexOf(element) >= 0;
};

var graphs = {};

(function(host) {
	function Graph(nodesNumber, edges) {
		this.nodesNumber = nodesNumber;
		this.initEdges(edges);
	};

	Graph.prototype.initEdges = function(edges) {
		var oThis = this,
			i = 0;

		this.edges = [];
		for (; i < this.nodesNumber; i++) {
			this.edges[i] = [];
		};		
		if (edges) {
			edges.forEach(function (edge) {
				oThis.edge(edge[0], edge[1], edge[2]);
			});
		};
	};

	Graph.prototype.edge = function(from, to, weight) {
		this.edges[from - 1][to - 1] = weight;
		return this;
	};
	
	Graph.prototype._constructShortestPath = function(distances, previous, unvisited, to) {
		var vertex = to,
		path = [];

		while (undefined != vertex) {
			path.unshift(vertex + 1);
			vertex = previous[vertex];
		};
			
		return {
			path: path,
			length: distances[to]
		};
	};

	Graph.prototype._getUnvisitedVertexWithShortestPath = function(distances, previous, unvisited) {
		var minimumDistance = Number.MAX_VALUE,
			vertex = null;
			
		unvisited.forEach(function (unvisitedVertex) {
			if (distances[unvisitedVertex] < minimumDistance) {
				vertex = unvisitedVertex;
				minimumDistance = distances[vertex];
			};
		});
		return vertex;
	};
	
	Graph.prototype._updateDistancesForCurrent = function(distances, previous, unvisited, current) {	
		for (var i = 0; i < this.edges[current].length; i++) {
			var currentEdge = this.edges[current][i];
			
			if ((undefined != currentEdge) &amp;&amp; unvisited.contains(i)) {
				if (distances[current] + currentEdge < distances[i]) {
					distances[i] = distances[current] + currentEdge;
					previous[i] = current;
				};
			};			
		};
	};

	//Dijkstra algorithm http://en.wikipedia.org/wiki/Dijkstra's_algorithm
	Graph.prototype.getShortestPath = function(from, to) {
		var unvisited = [],
		    current = null,
		    distances = [],
		    previous = [];

		from = from - 1;		
		to = to - 1;
		//Initialization
		for (var i = 0; i < this.nodesNumber; i++) {
			unvisited.push(i);
			//Infinity
			distances.push(Number.MAX_VALUE);
		};
		distances[from] = 0;
		
		while (true) {
			if (!unvisited.contains(to)) {
				return this._constructShortestPath(distances, previous, unvisited, to);
			};
			current = this._getUnvisitedVertexWithShortestPath(distances, previous, unvisited);
		
			//No path exists
			if ((null == current) || (Number.MAX_VALUE == distances[current])) {
				return {
		    		path: [],
		    		length: Number.MAX_VALUE
				};
			};
			this._updateDistancesForCurrent(distances, previous, unvisited, current);			
			unvisited.remove(current);
		};
	};

	host.Graph = Graph;
})(graphs);

var graph = new graphs.Graph(8, [
	[1, 2, 5], [1, 3, 1], [1, 4, 3],
	[2, 3, 2], [2, 5, 2],
	[3, 4, 1], [3, 5, 8],
	[4, 6, 2],
	[5, 7, 1],
	[6, 5, 1]
]);

var shortestPath = graph.getShortestPath(1, 7);

console.log("path = ", shortestPath.path.join(","));
console.log("length = ", shortestPath.length);

//No shortest path to the vertex '8'
console.log(graph.getShortestPath(1, 8));

This example demonstrates emulating classes with prototypes, extending the core language objects (Array), and working with data structures. All this should already be familiar to you, otherwise, please, refer to some JavaScript resource to quickly get up to speed with the language.

CoffeeScript

CoffeeScript addresses some of the JavaScript issues described above. It introduces classes, shortcuts for most common JavaScript boiler-plate code, such as @ for this and :: for prototype, saves on number of code lines, gets rid of curly braces and actively uses indentation to give structure to your program.

Here is the algorithm rewritten in CoffeeScript:

Array::remove = Array::remove || (element) ->
    index = @indexOf(element)
    @splice(index, 1) if index >= 0

graphs = {}

graphs.Graph = class Graph

    constructor: (@nodesNumber, edges) ->
        @initEdges(edges)

    initEdges: (edges) ->
        @edges = []
        @edges[i] = [] for i in [0..@nodesNumber]
        @edge edge... for edge in edges if edges
    
    edge: (from, to, weight) ->
        @edges[from - 1][to - 1] = weight

    _constructShortestPath = (distances, previous, unvisited, to) ->
        vertex = to
        path = []

        while vertex?
            path.unshift(vertex + 1);
            vertex = previous[vertex];

        path: path
        length: distances[to]
        
    _getUnvisitedVertexWithShortestPath = (distances, previous, unvisited) ->
        minimumDistance = Number.MAX_VALUE

        for unvisitedVertex in unvisited
            if (distances[unvisitedVertex] < minimumDistance)
                vertex = unvisitedVertex
                minimumDistance = distances[vertex]

        vertex

    _updateDistancesForCurrent: (distances, previous, unvisited, current) ->
        for edge, i in @edges[current]
            if ((undefined != edge) &amp;&amp; edge >= 0 &amp;&amp; i in unvisited &amp;&amp; (distances[current] + edge < distances[i]))
                distances[i] = distances[current] + edge
                previous[i] = current

    #Dijkstra algorithm http://en.wikipedia.org/wiki/Dijkstra's_algorithm
    getShortestPath: (from, to) ->
        unvisited = []
        current = null
        distances = []
        previous = []

        from = from - 1        
        to = to - 1

        #Initialization
        for i in [0..@nodesNumber]
            unvisited.push(i)
            #Infinity
            distances.push(Number.MAX_VALUE)

        distances[from] = 0
        
        while (true)
            if (not (to in unvisited))
                return _constructShortestPath(distances, previous, unvisited, to);

            current = _getUnvisitedVertexWithShortestPath(distances, previous, unvisited)
        
            #No path exists
            if ((null == current) || (undefined == current) || (Number.MAX_VALUE == distances[current]))
                return {
                    path: []
                    length: Number.MAX_VALUE
                }

            @_updateDistancesForCurrent(distances, previous, unvisited, current)            
            unvisited.remove(current)

        return

graph = new graphs.Graph(8, [
    [1, 2, 5], [1, 3, 1], [1, 4, 3],
    [2, 3, 2], [2, 5, 2],
    [3, 4, 1], [3, 5, 8],
    [4, 6, 2],
    [5, 7, 1],
    [6, 5, 1]
]);

shortestPath = graph.getShortestPath(1, 7)

console.log("path = ", shortestPath.path.join(","))
console.log("length = ", shortestPath.length)

#No shortest path to the vertex '8'
console.log(graph.getShortestPath(1, 8))

As it can be seen CoffeeScript is a completely different language that can be then (usually) compiled into JavaScript or executed outright. It is not a superset or subset of JavaScript and you cannot just freely mix JavaScript and CoffeeScript constructs in one program. There is still a mechanism for executing JavaScript embedded inside your CoffeeScript, although normally you would not use it.

The CoffeeScript version is somewhat shorter: the number of lines of the CoffeeScript code in our example is approximately 2/3 of the number of lines of the JavaScript version.

From my brief experience with it I can say that programming in CoffeeScript requires advanced JavaScript knowledge and you often have to think about what exact JavaScript code will be produced from your CoffeeScript code.

Tooling support also lags behind so if something goes wrong in your code you will have to debug the resulting JavaScript while simultaneously matching it with the original CoffeeScript source. The amount of time it took me to write the CoffeeScript version of the Dijkstra’s algorithm was actually the same or larger than what I spent on writing the JavaScript version, but then again, I am not an experienced CoffeeScript programmer and maybe as time goes, the speed of development will increase.

Apart from the lack of good development tools for CoffeeScript (at least I did not find any) the resulting code is a bit cryptic and terse, a bit like Bash. Overall, the language somewhat reminds of Ruby and Python.

The main plus of CoffeeScript is getting rid of the syntactic noise that can often be encountered in JavaScript, like Graph.prototype. or .forEach(function() {…}), and as a result you start to see the core logic of the program better. Also, it is nice that CoffeeScript introduces classes, it potentially gives large programs more structure in a more unified way than in JavaScript where everybody devises their own way to emulate class-based inheritance.

TypeScript

TypeScript is a superset of JavaScript enhanced with type annotations, classes and modules. It demonstrates a rather conservative approach to addressing the many issues of JavaScript compared to other languages in this article as TypeScript does not try to replace JavaScript, in fact, any valid JavaScript code is valid TypeScript code.

Here is the TypeScript version:

interface Array {
    remove(element: any): void;
    contains(element: any): bool;
}

Array.prototype.remove = Array.prototype.remove || function(element) {
    var index = this.indexOf(element);

    if (index >= 0) {
        this.splice(index, 1);
    };
};

Array.prototype.contains = Array.prototype.contains || function(element) {
    return this.indexOf(element) >= 0;
};

module graphs {
    export class Graph {
    
        edges: number[][];
    
        constructor(public nodesNumber: number, edges: number[][]) {
            this.initEdges(edges);
        }
        
        initEdges(edges: number[][]): void {
            var oThis = this,
            i = 0;

            this.edges = [];
            for (; i < this.nodesNumber; i++) {
                this.edges[i] = [];
            };        
            if (edges) {
                edges.forEach(function (edge) {
                    oThis.edge.apply(oThis, edge);
                });
            };
        }
        
        edge(from: number, to: number, weight: number): Graph {
            this.edges[from - 1][to - 1] = weight;
            return this;
        }

        //Dijkstra algorithm http://en.wikipedia.org/wiki/Dijkstra's_algorithm
        getShortestPath(from: number, to: number): {path: number[]; length: number;} {
            var unvisited = [],
                current = null,
                distances = [],
                previous = [];

            from = from - 1;        
            to = to - 1;
            //Initialization
            for (var i = 0; i < this.nodesNumber; i++) {
                unvisited.push(i);
                //Infinity
                distances.push(Number.MAX_VALUE);
            };
            distances[from] = 0;
        
            while (true) {
                if (!unvisited.contains(to)) {
                    return this._constructShortestPath(distances, previous, unvisited, to);
                };
                current = this._getUnvisitedVertexWithShortestPath(distances, previous, unvisited);
        
                //No path exists
                if ((null == current) || (Number.MAX_VALUE == distances[current])) {
                    return {
                        path: [],
                        length: Number.MAX_VALUE
                    };
                };
                this._updateDistancesForCurrent(distances, previous, unvisited, current);            
                unvisited.remove(current);
            };
        }

        private _constructShortestPath(distances: number[], previous: number[],
             unvisited: number[], to: number): { path: number[]; length: number; } {
            var vertex = to,
            path = [];

            while (undefined != vertex) {
                path.unshift(vertex + 1);
                vertex = previous[vertex];
            };
            
            return {
                path: path,
                length: distances[to]
            };
        }

        private _getUnvisitedVertexWithShortestPath(distances: number[], previous: number[], unvisited: number[]): number {
            var minimumDistance = Number.MAX_VALUE,
                vertex = null;
            
            unvisited.forEach(function (unvisitedVertex) {
                if (distances[unvisitedVertex] < minimumDistance) {
                    vertex = unvisitedVertex;
                    minimumDistance = distances[vertex];
                };
            });
            return vertex;
        }

        private _updateDistancesForCurrent(distances: number[], previous: number[], unvisited: number[], current: number): void {    
            for (var i = 0; i < this.edges[current].length; i++) {
                var currentEdge = this.edges[current][i];
            
                if ((undefined != currentEdge) &amp;&amp; unvisited.contains(i)) {
                    if (distances[current] + currentEdge < distances[i]) {
                        distances[i] = distances[current] + currentEdge;
                        previous[i] = current;
                    };
                };            
            };
        }
    }
}

var graph = new graphs.Graph(8, [
    [1, 2, 5], [1, 3, 1], [1, 4, 3],
    [2, 3, 2], [2, 5, 2],
    [3, 4, 1], [3, 5, 8],
    [4, 6, 2],
    [5, 7, 1],
    [6, 5, 1]
]);

var shortestPath = graph.getShortestPath(1, 7);

console.log("path = ", shortestPath.path.join(","));
console.log("length = ", shortestPath.length);

//No shortest path to the vertex '8'
console.log(graph.getShortestPath(1, 8));

The main focus of the language is not minimizing the number of lines of the resulting code as in CoffeeScript, but rather making JavaScript friendlier for external tools, static analysis and large project development. As it can be seen, the number of lines is roughly the same as in the JavaScript version.

Converting the existing JavaScript code into more idiomatic TypeScript code is very fast and simple, and can be done seamlessly and gradually for an existing code base, which is a huge plus when deciding to migrate an existing JavaScript project to TypeScript.

TypeScript is also compiled to JavaScript with the command tsc just like the CoffeeScript code in the previous section. However, unlike CoffeeScript, TypeScript has a good tool support in the form of a Visual Studio editor and potentially plugins for other IDEs. For example, the latest version of WebStorm will include support for TypeScript. Developing in TypeScript feels a lot like developing in JavaScript but you feel yourself a bit safer thanks to the type annotations.

The TypeScript language looks very promising. Some of its features have analogs in the recent version of the JavaScript standard ECMAScript 6. The main plus of the language is that it does not reject JavaScript outright but rather tries to improve on the existing language while avoiding introducing too many new concepts for a JavaScript developer.

Dart

Dart, like CoffeeScript, is a separate language, although there are considerably more similarities with JavaScript syntaxwise. Sometimes it feels a bit like trying to bring some Java or C# into JavaScript: it has classes, generics, lists, maps, etc. Dart can be compiled into JavaScript or run directly on a Dart VM.

The Dart version of the Dijkstra’s algorithm:

library Graphs;

class Graph {
  num nodesNumber;
  List<List<num>> edges;
  
  Graph(num nodesNumber, List<List<num>> edges) {
      this.nodesNumber = nodesNumber;
      initEdges(edges);
  }

  void initEdges(List<List<num>> edges) {
      this.edges = new List<List<num>>();
      for (int i = 0; i < nodesNumber; i++) {
          List<num> row = new List<num>();

          for (int j = 0; j < nodesNumber; j++) {            
              row.add(null);
          }
          this.edges.add(row);
      }
      if (!edges.isEmpty) {
          edges.forEach((e) {
              edge(e[0], e[1], e[2]);
          });
      }
  }
  
  void edge(num from, num to, num weight) {
      edges[from - 1][to - 1] = weight;
  }
 
  Map _constructShortestPath(List<num> distances, List<num> previous, List<num> unvisited, num to) {
      num vertex = to;
      List<num> path = new List<num>();

      while (null != vertex) {
          path.add(vertex + 1);
          vertex = previous[vertex];
      };
      
      return {
         'path': path,
         'length': distances[to]
      };
  }
  
  num _getUnvisitedVertexWithShortestPath(List<num> distances, List<num> previous, List<num> unvisited) {
    num minimumDistance = 1/0;
    num vertex = null;
      
    unvisited.forEach((unvisitedVertex) {
      if (distances[unvisitedVertex] < minimumDistance) {
        vertex = unvisitedVertex;
        minimumDistance = distances[vertex];
      };
    });
    return vertex;
  }
  
  void _updateDistancesForCurrent(List<num> distances, List<num> previous, List<num> unvisited, num current) {  
    for (num i = 0; i < edges[current].length; i++) {
      num currentEdge = edges[current][i];
      
      if ((null != currentEdge) &amp;&amp; unvisited.contains(i)) {
        if (distances[current] + currentEdge < distances[i]) {
          distances[i] = distances[current] + currentEdge;
          previous[i] = current;
        };
      };
    };
  }
  
  //Dijkstra algorithm http://en.wikipedia.org/wiki/Dijkstra's_algorithm
  Map getShortestPath(num from, num to) {  
      List<num> unvisited = new List<num>();
      num current = null;
      List<num> distances = new List<num>();
      List<num> previous = new List<num>();

      from = from - 1;    
      to = to - 1;
      //Initialization
      for (num i = 0; i < nodesNumber; i++) {
          unvisited.add(i);
          //Infinity
          distances.add(1/0);
          previous.add(null);
      };
      distances[from] = 0;
    
      while (true) {
          if (!unvisited.contains(to)) {
              return _constructShortestPath(distances, previous, unvisited, to);
          };
          current = _getUnvisitedVertexWithShortestPath(distances, previous, unvisited);
    
          //No path exists
          if ((null == current) || (1/0 == distances[current])) {
              return {
                  'path': [],
                  'length': 1/0
              };
          };
          this._updateDistancesForCurrent(distances, previous, unvisited, current);     
          unvisited.remove(current);
      };
  }
}

void main() {
    Graph graph = new Graph(8, [
        [1, 2, 5], [1, 3, 1], [1, 4, 3],
        [2, 3, 2], [2, 5, 2],
        [3, 4, 1], [3, 5, 8],
        [4, 6, 2],
        [5, 7, 1],
        [6, 5, 1]
    ]);
  
    Map shortestPath = graph.getShortestPath(1, 7);

    print("path = ");
    print(shortestPath['path'].join(","));
    print("length = ");
    print(shortestPath['length']);
  
    //No shortest path to the vertex '8'
    print(graph.getShortestPath(1, 8));
}

From what I read and heard about Dart it seems that its main goal is to enable development of faster web applications. Using raw JavaScript may often lead to suboptimal performance, when using Dart on the other hand, you leverage the power of its compiler that will likely produce more optimal JavaScript code than what you would write yourself or you leverage the engineering effort invested into the Dart VM.

It would be actually interesting to look at the benchmarks how Dart, TypeScript, CoffeeScript and JavaScript applications perform compared to each other but I have a strong suspicion that Dart code will be the fastest one.

Like in TypeScript, there is support for better structuring of your application with libraries, classes and types. The brevity of code is not a goal like in CoffeeScript, instead the language tries to achieve better speed and maintainability.

A bit about tools and editors. There is a special Dart editor which has code assistance and highlighting and makes development much more pleasant. In the future there can also appear plugins for popular IDEs like, Eclipse.

The greatest disadvantage of Dart is the need to learn a new language, however, the language is quite simple, has good online documentation and learning it is still faster than learning CoffeeScript.

Another impression I got from using the language and its library is that it is a bit raw, for example, some features that you would expect to find are sometimes missing: there are no varargs, print accepts only one argument, etc. But this is still much better than Java where you constantly see missing things.

Web Application Development

The main area where JavaScript is used is Web application development, both on the client side and on the server side. The considered languages are generic programming languages that can easily be used in this domain area combined with the existing libraries, please, refer to the documentation on the sites dedicated to a specific language.

ECMAScript 6

The recent version of standard for JavaScript includes support for classes and modules similar to what we considered in other JavaScript related languages here, which should make creating large complex applications easier. See, for example, the following article

Conclusions

  • There is a huge need for JavaScript language improvements due to the changed landscape of JavaScript development, as a result a number of languages has appeared
  • Main improvements come in the areas of maintainability for large complex projects (classes, modules, types), code brevity and performance
  • Introduction of classes, modules (libraries) and types in Dart and TypeScript allows to implement better IDE support
  • Considered languages are generic and can be used both on the client and server side
  • All considered languages can be compiled into JavaScript which plays here a role of a low level assembly language, although it is itself a high-level programming language
  • Some languages are still fast moving and changing and have only their first versions available for use (Dart, TypeScript)
  • All languages preserve functions as first-class citizens which seems to be a very powerful feature in JavaScript

And here is a small matrix that compares the languages against each other:

js_langs

Legend:

Better Structure – it is easy to structure programs into modules
Editor Friendly – it is possible to write editors with re-factoring and autocomplete
Better Speed – improvement in the performance of the code
Large Applications – complex applications with large teams involved are easier to develop
Brevity of Code – if the number of lines of code is reduced
Ease of Learning – whether it is easy to start programming in a language for a JavaScript developer
Easy Debugging – it is easy to find problems in code and debug

There are still quite a few languages that compile to JavaScript but were not covered here. Please, see the following list for more details in case you are interested. For example, there is ClojureScript: a Lisp dialect that can be compiled to JavaScript and many other interesting languages. Unfortunately, I did not yet have time to look at some of them and might as well have missed something that is worth attention.

Links

Eloquent JavaScript (book)
JavaScript: The World’s Most Misunderstood Programming Language
Dijkstra’s algorithm
CoffeeScript language
The Little Book on CoffeeScript
TypeScript language
Goto 2012: TypeScript Keynote
Dart language
Google I/O 2012: Dart – A Modern Web Language
ECMAScript 6
A Few New Things Coming To JavaScript

Measuring Language Popularity is Harder Than Many Think

Contents

What languages are most popular?
Measurement method
Technical details
Comparing with other measurements
No comprehensive research anywhere

What languages are most popular?

Obviously it is interesting to know which programming languages are most popular. If some language is popular, this means that you will have plenty of resources such as books and articles to learn it, also, probably, good community support and you will be able to find a lot of ready libraries and tools for that language as well just because so many other developers are already using it. Also it may be interesting to see how our most popular programming language, which we all tend to have once in a while, scores relative to other languages.

Measurement method

But how to measure the language popularity on the Web? The first thing that came to mind was to use different search engines and compare numbers of results for different languages. This seemed like the simplest and the most obvious thing to do. But not so fast! Unfortunately, it turns out, that search counts returned by most popular search engines are just rough estimates of the number of the results they think they should give to you based on your search query, not all the possible results. More details are explained in this article. In other words, search engines are doing well what they are supposed to do: context based search. Nobody designed them to compute exact aggregations over huge amounts of data and they do not usually do this well.

What other options can be there? For once, we can select a few sites with job postings, such as monster.com, or with software development articles and presentations like infoq.com, various forums for software engineers, etc. On these sites we can search for certain programming languages, and by comparing the results we can estimate the relative popularity of the languages.

However, searching just one such resource may not be enough, for example, Java developers can really like one site and Ruby developers at the same time can like completely another site. As later we will see this is actually the case with github.com, which is really popular with JavaScript developers and with stackoverflow.com, which has a large number of C# related questions. But at least we can try to search one of such sites and compare the results with the data we already have from other sources to be more sure in our measurements.

I chose stackoverflow.com as it is a really good and popular site with questions and answers on every software development topic you can think about.

Technical details

So, now I will take the list of all the programming languages from somewhere and search for them on stackoverflow.com. Let’s take, for example, the list of all the languages that are used on github.com. Then we would have to search for each language and write down the number of search results for each one of them. But since it is a really boring and time consuming task and computers were invented a long time ago, let’s write a simple script that will help us do the mundane work and execute around 90 searches. By automating a bit we will also have more confidence in the results as manually doing something is usually more error-prone.

For automation we will use a headless WebKit browser PhantomJS and will generate an HTML report right from our PhantomJS script. The result will be just a simple bar chart rendered with Google Chart Tools.

The complete version of the code for the script is available here.

Some of the code highlights from the key parts of the script are listed below.

Getting the list of all the languages from github.com


function getAllGithubLanguages(callback) {
    page.open("https://github.com/languages", function (status) {
        var allLanguages = page.evaluate(function() {
            var links = document.querySelectorAll(".all_languages a");
            return Array.prototype.slice.call(links, 0).map(function(link) {
                return link.innerHTML;
            });
        });
        callback(allLanguages);
    });
};

By the way, notice how easy it is to work with DOM in JavaScript: all the API specifically adapted for this is already there, so PhantomJS allows us to use querySelectorAll and CSS selectors.

Getting the number of results once they are displayed in the browser.


function getSummaryCount() {
    var resultStats = document.querySelector("div.summarycount"),                   
        regex = /[\d,.]+/g,
        resultsNumber = -1;
                
    if (resultStats) {
        resultsNumber = regex.exec(resultStats.innerHTML)[0];
        resultsNumber = resultsNumber.replace(/[,\.]/g, "");
    };
    return parseInt(resultsNumber);
};

Searching for each language with two URLs in case the first URL produces no results.


function openResultsURL(url, callback) {
    page.open(url, function (status) {                 
        callback(page.evaluate(getSummaryCount));
    });    
};

function search(term, callback) {
    var urls = [
        "http://stackoverflow.com/search?q=" + encodeURIComponent(term),
        "http://stackoverflow.com/tags/" + encodeURIComponent(term)
    ];

    openResultsURL(urls[0], function(resultsCount) {
        if (resultsCount > 0) {
            callback(term, resultsCount);
        } else {
            openResultsURL(urls[1], function(resultsCount) {
                callback(term, resultsCount);
            });
        }
    });
};

Also you may notice how we pass callbacks everywhere. This may seem a bit strange at first if you have not programmed in JavaScript a lot, but this is actually the most common style of programming in JavaScript both on the client and the server side. Here PhantomJS encourages asynchronous programming as well because interaction with the browser is also asynchronous. Each callback is executed once the results are ready at an appropriate point in time. This provides for a more declarative style of programming too.

The entry point into the script, collecting all the search results and saving a generated report.


function saveReport(html) {
    fs.write("top_languages_report.html", html, "w");
};

getAllGithubLanguages(function (languages) {
    var statistics = {},
        int;
    
    languages = Array.prototype.slice.call(languages, 0);
    console.log("Number of languages = ", languages.length);
    int = setInterval(function waitForStatistics() {
        if (0 == activeSearches) {
            if (languages.length > 0) {
                activeSearches++;                
                search(languages.shift(), function (term, count) {
                    console.log(term + " found " + count + " times");               
                    statistics[term] = count;
                    activeSearches--;
                });
            } else {
                console.log("Finished all searches!");
                clearInterval(int);
                saveReport(generateReport(statistics));
                phantom.exit();
            };
        };
    }, TIMEOUT);
});

The code for generating reports that is also in the script is a bit awkward, largely due to the lack of a standard JavaScript library for working efficiently with data structures. It takes quite a bit of effort to transform the results to the format needed for rendering the chart, but the code for doing this is not really what this script is all about, it is just some utility boiler plate that unfortunately cannot be avoided here.So let’s just omit this part.

And, voilà the final chart with the top 30 most popular on stackoverflow.com programming languages.

However, we cannot reach any conclusions based just on the results from one site. Hardly C# is the most popular language, this must be a stackoverflow.com thing.

We can go one step further and search some other sites like Amazon.com but will it give us any more confidence? Let’s stop at this point and compare our results with the results of other similar researches obtained by using slightly different methods.

Comparing with other results

So the top ten languages we got are: C#, Java, PHP, JavaScript, C++, Python, Objective-C, C, Ruby, and Perl.

First, let’s look at TIOBE which uses search engine result counts and we discussed above why it may be not the best idea. It is basically the same 10 languages, but instead of JavaScript it is Visual Basic. Well, maybe Visual Basic has a very lively online community? I doubt it somehow, probably, it is just a lot of Visual Basic books and articles that make it so popular in this index, but everything is possible.

OK, what about the number of projects in different languages at github.com? The following statistics is provided on the site. Also very close to the list that we obtained but instead of C# there is Shell which, probably, can be explained by a lot of people with Linux background who use github.com. It also seems that C# developers do not favor github.com for some reason.

I would say we have a good correlation between the results for the top languages. Still I will be very careful with saying how much the top languages are popular relative to each other since different sources yielded very different results. But, at least, we get the following 12 most popular at the moment programming languages:

C#, Java, PHP, JavaScript, C++, Python, Objective-C, C, Ruby, Perl, Shell, Visual Basic

No comprehensive research anywhere

The problem with measuring the popularity of programming languages seems to be more complex than we initially thought. Developers of a specific language tend to be concentrated around a few sites and different sites give very different results like stackoverflow.com and github.com in the present article. In a way the problem is similar to measuring the popularity of human languages by randomly going to different large world cities. After visiting a couple dozen of cities we may start to get an idea which human languages are popular, but we will have hard time measuring the relative popularity of these languages, and especially hard time with less popular languages: we may just not visit a single large city where those languages are spoken. So, in order to make a good research we should statistically compare results from many different cities (sites), and know the structure of the world (Web) well. Unfortunately, I could not find any such research on the Web and doing it myself requires much more effort than just a weekend project. But even then, is the language popularity only limited to its online popularity?

Links

Git-based collaboration in the cloud github.com
Software development Q&A stackoverflow.com
PhantomJS
Google Chart Tools
Google Chart Tools: Bar Chart
Count results
Github.com top languages
TIOBE programming community index

Into the Land of Functional Programming with JavaScript

Contents

Enter JavaScript…
Running examples
Functions are “first-class citizens”
Closures and scopes
Partial Application
Memoization
Lazy evaluation
Not a functional language but

Enter JavaScript…

JavaScript is an interesting language. Syntactically it resembles C, C++ and Java, but it was also inspired by a functional language: Scheme, which is a dialect of Lisp. That JavaScript has a C-like syntax is largely due to the hype around Java at the time JavaScript was introduced. The language was rushed to the market, leaving in it a few bad design decisions like global variables, ‘with’ construct, etc. The name of the language itself is a bit misleading: it has nothing to do with Java except for a slight syntactic similarity.

JavaScript still has somewhat bad reputation with some people who do not know the language well, but encountered a few problems when programming for the browser or heard some unfavorable opinions from the people who did so. The language itself, however, had nothing to do with the inconsistent client-side API implementations in different browsers. By the way, there are plenty of client-side libraries such as JQuery that hide the browser differences behind their API and the developer usually does not have to deal with browser specific issues.

Contrary to the popular misconception JavaScript is not used only in browser, it became quite popular recently on the server-side. Why does the language continue to evolve and be successful both on the client and server side? Why more and more people choose JavaScript as the primary language in which they develop software? The examples below will provide a few of the answers to these questions. There are a few very nice design concepts in the language that have been there from the very beginning. JavaScript is flexible and powerful when it comes to working with functions, and this is what we would like to explore here.

Running examples

To execute examples you can use Firefox and the JavaScript console of the Firebug extension for Firefox The code makes use of “console.log” but there is nothing browser-specific in the examples and with minor modifications they can be run on every JavaScript implementation. You may take your time to set up the development environment so that you can play with examples in this article which is the best way to learn.

Functions are “first-class citizens”

In JavaScript functions are “first-class citizens”: they can be passed as arguments and returned from other functions. You do not have to wrap your function in an anonymous class like in Java to do so. To illustrate this, let’s add a few useful methods for working with arrays.

function forEach(arr, callback) {
    for (var i = 0; i < arr.length; i++) {
        callback(arr[i], i);
    };
};

function map(arr, callback) {
    var result = [];
    for (var i = 0; i < arr.length; i++) {
        result.push(callback(arr[i]));
    };
    return result;
};

function reduce(arr, initial, callback) {
    var accumulated = initial;
    for (var i = 0; i < arr.length; i++) {
        accumulated = callback(accumulated, arr[i]);
    };
    return accumulated;
};

//Examples
var x = [1, 2, 3, 4, 5];

console.log("x = ");
forEach(x, function (el) {
    console.log(el);
});

console.log("squares of x = ");
forEach(map(x, function (el) {
    return el * el;
}), function (el) {
    console.log(el);
});

console.log("sum of elements of x = ");
console.log(reduce(x, 0, function (sum, el) {
    return sum + el;
}));

console.log("product of elements of x = ");
console.log(reduce(x, 1, function (sum, el) {
    return sum * el;
}));

forEach performs an action for each element, map transforms each element and reduce computes an aggregate value for a given array. The action, transformation or aggregation are specified by the callback function.

Even in this simple example it is already worth noting how we can combine two different callbacks with reduce and get completely different results. The code present in reduce is easy to reuse and we reused it twice: the action performed on the element is abstracted away from the way we iterate over the elements.

But this still looks a bit ugly: we have to always pass an array as an argument. In JavaScript it is easy to fix that by adding the methods forEach, map and reduce onto the Array class. To do that we will add functions to the prototype property of the Array. The prototype here is just a special kind of object, properties of which will be available in every created Array instance. For more details look at this explanation of prototypal inheritance in JavaScript but in this post you can also view this just like a small magic trick.

Array.prototype.forEach = function(callback) {
    for (var i = 0, length = this.length; i < length; i++) {
        callback(this[i], i);
    };
};

Array.prototype.map = function(callback) {
    var result = [];
    for (var i = 0, length = this.length; i < length; i++) {
        result.push(callback(this[i]));
    };
    return result;
};

Array.prototype.reduce = function(initial, callback) {
    var accumulated = initial;
    for (var i = 0, length = this.length; i < length; i++) {
        accumulated = callback(accumulated, this[i]);
    };
    return accumulated;
};

//Examples
var x = [1, 2, 3, 4, 5];

console.log("x = ");
x.forEach(function (el) {
    console.log(el);
});

console.log("squares of x = ");
x.map(function (el) {
    return el * el;
}).forEach(function (el) {
    console.log(el);
});

console.log("sum of elements of x = ");
console.log(x.reduce(0, function (sum, el) {
    return sum + el;
}));

console.log("product of elements of x = ");
console.log(x.reduce(1, function (sum, el) {
    return sum * el;
}));

The latest version of JavaScript already includes the methods forEach, map and reduce for arrays similar to what we just implemented and it would be wise not to override these methods. We will only define them on Array.prototype in case they are not yet there (maybe, for some older browser versions).

if (!Array.prototype.forEach) {
    Array.prototype.forEach = function(callback) {
        ...
    };
};
if (!Array.prototype.map) {
    Array.prototype.map = function(callback) {
        ...
    };
};
if (!Array.prototype.reduce) {
    Array.prototype.reduce = function(initial, callback) {
        ...
    };
};

This shows that we can treat functions as values and use them in conditional statements. Besides this simple example passing functions as arguments is also widely used in client-side JavaScript programming for registering event listeners. We can, for example, add a click listener to body of the current document.

document.body.addEventListener("click", function (event) {
    console.log("Click handled", event);
}, false);

Not only can we pass functions as arguments to other functions it is also possible to return a function from another function.

function op(str) {
    switch (str) {
        case '+': return function(x, y) {
            return x + y;
        };
        case '+': return function(x, y) {
            return x + y;
        };
        case '-': return function(x, y) {
            return x - y;
        };
        case '*': return function(x, y) {
            return x * y;
        };
        case '/': return function(x, y) {
            return x / y;
        };
    };
};

console.log("op('+')(1, 2) = ", op('+')(1, 2));
console.log("op('-')(5, 3) = ", op('-')(5, 3));
console.log("op('*')(4, 5) = ", op('*')(4, 5));
console.log("op('/')(12, 3) = ", op('/')(12, 3));

This is a bit artificial example, but it illustrates well the general idea that a function can be considered a value.

Closures and scopes

There is a scope associated with each function invocation. In fact in JavaScript until the latest versions there were no other scopes, that is, a pair of brackets {} did not define a scope like in other languages such as Java or C. In the latest version it is possible to use let to define a scope, but this will not be covered in the present article.

At the time of its invocation each function captures the variables in the enclosing scope in which this function has been invoked. We say that the function “closes over” the values of the variables in the enclosing scope. This is called “closure.” The following counter example demonstrates how the counter variable is “living” in a closure:

function getCounter() {
    var counter = 0;
    return {
        increment: function() {
            return counter++;
        },
        reset: function() {
            counter = 0;
        }
    };
};

//Getting the counter object
var counter = getCounter();

//Executing its methods
console.log(counter.increment());
counter.reset();
console.log(counter.increment());

We return an object from the getCounter method and the variable counter remains accessible for the functions defined in this object.

If we have a few function invocations then we can talk about a chain of scopes formed by a chain of function invocations much like in Scheme.

Partial Application

Partial application is converting a function of multiple arguments into a function with a fewer number of arguments. Simple example with multiplication:

function multiply(x, y) {
    return x * y;
};

function twice(x) {
    return multiply(x, 2);
};

console.log("multiply(2, 3) = ", multiply(2, 3));
console.log("twice(3) = ", twice(3));

In twice the second argument 2 is captured and we get a function of one variable x rather than two variables x and y. It is easy to build a generic solution for partially applying a function.

if (!Function.prototype.partial) {
    Function.prototype.partial = function(argTransformer) {
        //The current function that we partially apply
        var f = this;
        return function() {
            //Need to convert the function arguments into an array
            var args = Array.prototype.slice.call(arguments, 0);

            /*
             * Transforming the arguments and calling the initial function
             * with the transformed arguments. 'this' here is determined by the context
             * of invocation of the partially applied function and is not 'f'
             */
            return f.apply(this, argTransformer(args));
        };
    };
};

var multiply = function(x, y) {
    return x * y;
};
var double = multiply.partial(function (args) {
    args.push(2);
    return args;
});
var triple = multiply.partial(function (args) {
    args.push(3);
    return args;
});

console.log("multiply(2, 5) = ", multiply(2, 5));
console.log("double(3) = ", double(3));
console.log("triple(4) = ", triple(4));

Initially we keep the reference to this which references the function for which partial has been invoked. We use this reference later in the anonymous function that we return from partial to execute the original function together with the captured arguments and the arguments passed to the anonymous function at the point of its invocation. argsTransformer, which was the argument to the original partial invocation, combines the passed and captured arguments inside the returned anonymous function. Also, note that this in the anonymous function returned from partial is different from what is stored in the f variable, it is now the object on which the anonymous function was invoked.

Memoization

Memoization is an optimization technique for avoiding expensive calculations in repeated function calls. Simple example:

function expensiveComputation(x) {
    return x * x;
};

var cache = {};

function memoizedExpensiveComputation(x) {
    var result = cache[x];

    if (!result) {
        result = expensiveComputation(x);
        cache[x] = result;
    };
    return result;
};

console.log("expensiveComputation(5)", expensiveComputation(5));
console.log("memoizedExpensiveComputation(5)", memoizedExpensiveComputation(5));

memoizedExpensiveComputation caches the values that were already computed for particular arguments and returns these values directly from the cache avoiding calling expensiveComputation.

With JavaScript it is easy to build a generic solution for function memoization.

function memoize(func, host, hash) {
    //By default memoize a function on the window object
    var host = host || window,
        hash = hash || {},
        original = host[func];
    //Only functions can be memoized
    if (!host[func] || !(host[func] instanceof Function)) {
        throw "Can memoize only a function or function is not defined in host";
    };
    //Redefine the function on the host object
    host[func] = function() {
        //The key in the cash is a JSON representation of arguments
        var jsonArguments = JSON.stringify(arguments);
        //If the value has not yet been computed
        if (!hash[jsonArguments]) {
            //Calling the original function with the arguments provided to host[func],
            //'this' in the original function will also be the same as in the redefined function in order to handle
            //host[func].call and host[func].apply
            hash[jsonArguments] = original.apply(this, Array.prototype.slice.call(arguments, 0));
        };
        return hash[jsonArguments];
    };
};

function fib(num) {
    return (num < 2) ? num : this.fib(num - 1) + this.fib(num - 2);
};
memoize("fib");

console.log("fib(5) =", fib(5));
console.log("fib(10) =", fib(10));
console.log("fib(11) =", fib(11));

First we check that host contains the function, name of which was passed as the first argument to memoize. If it does, we keep the reference to this function and then redefine the function host[func] just like in the simple example before. If the computed value can be looked up in the cache, than we return it without actually calling the original function, otherwise we call the original function and store the result in the cache. The key in the cache is the JSON representation of the arguments passed to the redefined host function. We have to call Array.prototype.slice on the arguments to convert them into an array object (a flaw in the design of JavaScript – arguments passed to the function is an array-like object, not an array) and then we call the original function original with apply on this which is defined by the invocation context of the redefined host[func]. We pass to the original function all the arguments that were passed to the redefined version of it. For user of the API using the redefined function is as transparent as using the original one. The call to memoize just redefines the function so that it starts returning already computed values from a cache.

Lazy evaluation

With JavaScript it is also relatively easy to implement lazy evaluation and lazy streams. Each stream consists of two parts: the head and the tail. The tail can be an actual element or a promise to compute the element. Execution of this promise to compute an element can be omitted at the point of defining the stream and can be done later. In JavaScript such a promise can be implemented as a function.

function node(head, tail) {
    return [head, tail];
};

function head(stream) {
    return stream[0];
};

function tail(stream) {
    var tail = stream[stream.length - 1];
    return (tail instanceof Function) ? tail() : tail;
};

function drop(stream) {
    var h = head(stream);
    var t = tail(stream);
    stream[0] = t ? t[0] : null;
    stream[1] = t ? t[1] : null;
    return h;
};

function iterate(stream, callback, limit) {
    while (head(stream) && ((undefined == limit) || (limit > 0))) {
        limit && limit--;
        callback(drop(stream));
    };
};

function show(stream, limit) {
    iterate(stream, function (x) {
        console.log(x);
    }, limit);
};

//Examples
function upto(from, to) {
    return (from > to) ? null : node(from, function() {
        return upto(from + 1, to);
    });
};
function upfrom(start) {
    return node(start, function() {
        return upfrom(start + 1);
    });
};

console.log("upto:");
show(upto(3, 6));

console.log("upfrom:");
show(upfrom(7), 10);

The key part in this code is the tail function where we check whether tail is a promise rather than an actual element (that is, a function) and execute this promise if needed. Then defining each particular lazy stream is as easy as recursively defining a promise for the next element.

It is further possible to “objectify” the lazy stream code so that each stream represents an object and add the ability to filter, transform and unite streams. The full implementation is available here

Not a functional language but

Despite all the flexibility and ease of working with functions JavaScript is not a functional language. It has mutable shared state and the notion of the time of execution: if one statement precedes another it is executed earlier. Also there is no tail call recursion optimization in JavaScript, so the following code will not be optimized:

function factorial(number) {
    if (0 == number) {
        return 1;
    };
    return number * factorial(number - 1);
};

console.log("factorial(10) = ", factorial(10));

While JavaScript is still not functional, the excellent support for functions helps a lot by adding the necessary flexibility and power to the language and in part explains the popularity of JavaScript both on the client and the server side.

More working examples like in this post can be found on github.com at “Higher-Order JavaScript” The code for this project was inspired by the blog series about “Higher-Order Ruby” and the “Higher-Order Perl” book. If you also like Ruby, please, visit the blog http://blog.grayproductions.net and consider buying the book http://hop.perl.plover.com/ if you want to learn some good Perl.

Links

1. Scheme programming language
2. Firebug
3. JavaScript prototypal inheritance
4. addEventListener
5. Partial Application
6. Memoization
7. Tail call
8. Lazy evaluation
9. “Higher-Order JavaScript”
10. “Higher-Order Ruby” blog series
11. “Higher-Order Perl” book